How to build a shower stall
Our DIY shower stall project was one to look forward to. Building the shower was not just a simple do-it-yourself project, it’s also a means to set up or makeover our small bathroom in the basement. After years of using buckets and improvised ways of bathing our family members inside the house, we finally get to enjoy the perks that comes with having a private shower stall. It’s an inexpensive way of transforming your bathroom in just about any space at home.
Building a shower stall isn’t rocket science, but it’s not as easy as cutting a hole in the wall and hoping for the best. Here are the steps you need to follow to build a shower stall properly.
How to build a shower stall
How to Build a Shower Stall. If you want to install a shower stall in your home but don’t want to spend the money on expensive custom-made units, you can build one yourself. The process is not difficult and requires only a few tools, such as a hammer and nails or screws.
Step 1 – Plan the Size of Your Shower Stall
The first step in building a shower stall is to plan the size of your unit. Measure the dimensions of the room where you plan to install your shower stall and add at least an extra foot on each side for clearance. You should also measure the height of your ceiling so that you can determine how far above the floor level you’ll need to build up before installing tile all around the walls and floor of your new unit.
Step 2 – Lay Out Drainage Options
If you plan on installing tile in your new shower stall, then it’s important that you think about drainage options before installing any tiles or fixtures inside the unit itself. Tile can crack if it doesn’t drain properly, so make sure there are no dips or depressions when laying out tiles during this step.
Building a shower stall is not as difficult as it sounds. You can build a shower stall in your home in just a weekend. What you need is some basic construction skills and tools, some good advice and a few supplies. The first step is to decide how large you want your shower to be. Smaller showers are easier to build than larger ones, but they may be too small for comfort if you are 6 feet tall or taller. If you plan to tile the walls of your shower stall, consider laying the tile before building the structure; this will allow you to see how much space you have available.
Build a frame for the stall by assembling 2×4 lumber with joist hangers screwed into place along each side of every joist (top and bottom). Drive screws through each joist hanger into the ends of adjacent joists to hold them together. Make sure that all joints fit tightly together and are square by measuring diagonals with a miter saw or framing square (a T-square with longer legs). Nail 1×2 cross braces between each pair of 2x4s at corners where four walls meet at right angles (see Photo 1). Cut these braces so that they overhang the outside edge of each 2×4 by about
A shower stall is a small bathroom area that has a shower head and one or more showerheads. The shower stall is usually constructed with tile, but it can also be built using other materials such as plastic or metal. Shower stalls are used in public buildings such as gymnasiums, locker rooms, swimming pools and bathhouses. They’re also used in private homes for personal hygiene purposes.
Building your own shower stall from scratch isn’t difficult if you have the right tools and materials on hand. Here are the steps you’ll need to follow:
Choose your location for the shower stall. You’ll need to decide where you want to build this fixture before getting started with construction. If you’re building it in an existing bathroom, then make sure there’s enough space for a new wall between two existing walls or against an exterior wall if possible. If you don’t have enough space in an existing bathroom, then consider building a new room just for the new shower stall instead of trying to squeeze it into an existing space that will leave no room for anything else once completed.
Plan out your design before starting any work so that everything fits together properly once finished with construction
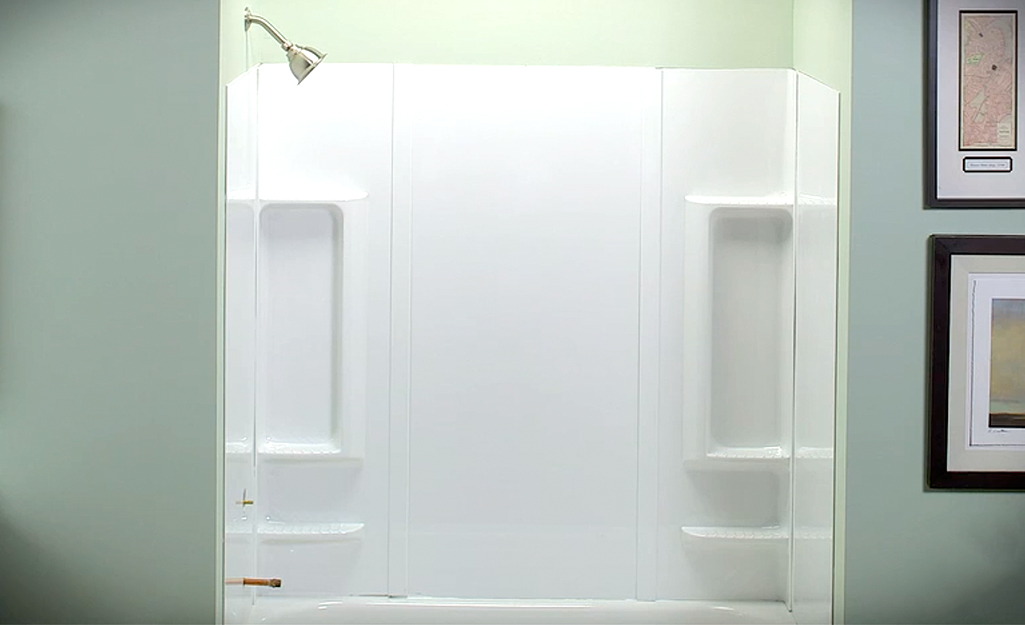
In this video, DIY Network experts show homeowners how to build a shower stall in the basement.
If you’ve decided that a new shower is just what your bathroom needs, then it’s time to get down to business and start building. This project is a bit more involved than simply hanging a curtain rod, but with some careful planning and a little help from your local home center, you’ll be able to make it happen.
First, decide whether you want a fixed or hinged shower door. The fixed door is easier to install because there are fewer moving parts and less hardware needed. However, if you want the option of swinging open your shower door once it’s installed, then go with the hinged door instead.
Next up: tile selection. Tile can be expensive so make sure you’re buying enough for your project (you don’t want to end up with extra). You can also opt for less expensive materials like vinyl flooring or granite but these options won’t last as long as ceramic tile or porcelain. It’s best to consult with an installer if you’re not 100% sure which material is best for your application
Building a shower stall is something that you can do yourself. If you are looking for a smaller, more economical option for your bathroom, then you may be interested in building your own shower stall and installing it yourself. There are many different types of shower stalls available today, including the ones made of ceramic or fiberglass. You need not worry about the cost because most of them are quite affordable and will not cost much money at all.
The first thing that you need to do is decide where you want to place the shower stall. This can be done by measuring the space where you want to install it and making sure that there is enough room for both the left and right side as well as the back of the stall.
The next thing that you need to do is make sure that there are no obstructions behind where you want to install your shower stall such as pipes or wires. If there are any obstructions behind where you want to install your shower stall, then make sure that they have been removed first before installing anything else in that area.
Once all obstructions have been removed from behind where you want to install your shower stall, then proceed with installing any plumbing fixtures such as hot water heater or water pump systems. Make
Building a shower stall in your basement can be a great way to add value to your home and make it more comfortable. The best way to build a shower stall is with tile, but if you want to go with ceramic or stone, that will work too. Here’s how to do it:
1. Install the studs in the walls at least 16 inches apart, using metal anchors where needed.
2. Install your plumbing lines and add any necessary shutoff valves.
3. Frame out the shower stall with 2-by-4s on 16-inch centers; install 1/2-inch plywood over the studs for flooring material. This is where you’ll need good ventilation — so make sure there are some exhaust fans nearby!
4. Install waterproofing materials such as tar paper or felt paper over the subfloor before laying down tiles or stone slabs; these materials help prevent water from seeping through cracks between tiles or stones and damaging your subfloor. You should also install drainage holes under any sink or tub fixtures that will be attached to this wall of your shower stall (if applicable).
5. Install tile or stone on top of the waterproofing materials and grout between them after
How to Build a Shower Stall in the Basement
A shower stall is a great way to add value to your home, and it can be relatively easy to install. If you’re looking for a do-it-yourself project that can be completed in less than a day, installing a shower stall is the way to go. But before you get started, there are some things you should know about building a shower stall in the basement.
First of all, if you want your finished product to look good and last as long as possible, it’s important that you use quality materials. If you’re new to construction projects, this may sound like an obvious tip but it’s something that many people don’t think about until it’s too late. The last thing that anyone wants is for their brand new shower stall or bathroom sink countertop to start cracking after only a few months of use. Luckily, there are plenty of places online where you can find high quality products at affordable prices.
The next thing that you’ll need when building your own shower stalls is access to water supply lines as well as drainage pipes in order to connect them up properly during installation. If there aren’t any available connections close by
You can build a shower stall with tile by following this step-by-step tutorial.
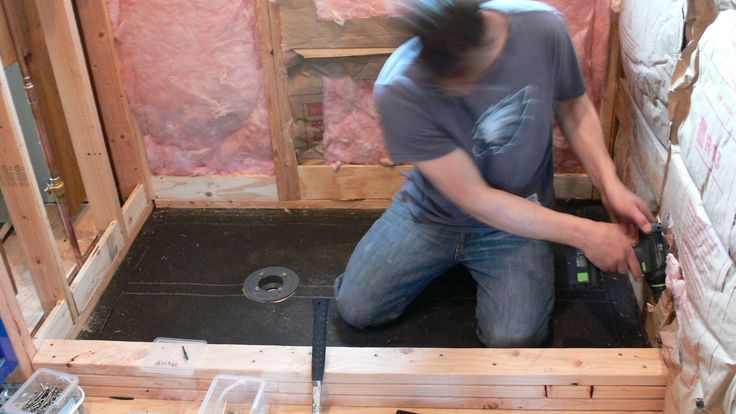
Step 1: Create the shower base
Use an angle grinder to cut through the concrete floor. Next, install plastic pipe anchors in the openings and connect them with plumbing pipes. Then, place 4×4 posts on top of the anchors and connect them with joist hangers.
Step 2: Install subflooring
Cover the joists with plywood sheets that are at least 3/4 inches thick. Cut out a hole for the drain and install a shower pan by following instructions from a plumber or local building inspector.
Step 3: Install drywall walls
Next, install drywall panels around the perimeter of the shower base using masonry screws or nails to hold them in place. Secure drywall panels at studs using metal clips called “speed clips.” Also attach a 1×2 strip around top edges of walls to cover joint between drywall panels and framing members.
Step 4: Install tiles on walls and floor
Tile installation requires some experience because it involves cutting and shaping tiles to fit around corners or other contours. However if you don’t mind working slowly and carefully it’s not difficult to do it yourself
Building a shower stall in the basement can be a cost-effective way to add value and functionality to your home. It’s also not as complicated as it sounds. While you may need to do some plumbing work, no advanced construction skills are required.
Here’s how to build a shower stall in your basement:
1. Buy the supplies
You’ll need a few basic supplies for this project, including tile grout, cement board, framing lumber and drywall screws. You’ll also want to buy some waterproofing materials like primer and paint for the walls and ceiling of your bathroom.
2. Install the walls
First, measure and mark out where you want your walls of the new shower stall to go on your basement floor. Make sure that at least one wall has an exterior door frame opening so that you can get into your bathroom from outside when needed. If you’re using cement board for walls, nail it up using 2x4s attached to studs with drywall screws every 6 inches or so along each side of each wall piece (or whatever distance works best for you). If you’re using drywall instead of cement board, screw it up into studs every 12 inches or so along each side of each
A shower stall is a great addition to any home. It provides a place to clean up and relax, which can be especially useful when you have kids in the house.
You can build a shower stall out of concrete or ceramic tile, but the latter is more durable and easier to clean. To build a shower stall that looks great and lasts for years, follow these tips:
Choose Your Shower Stall Material Wisely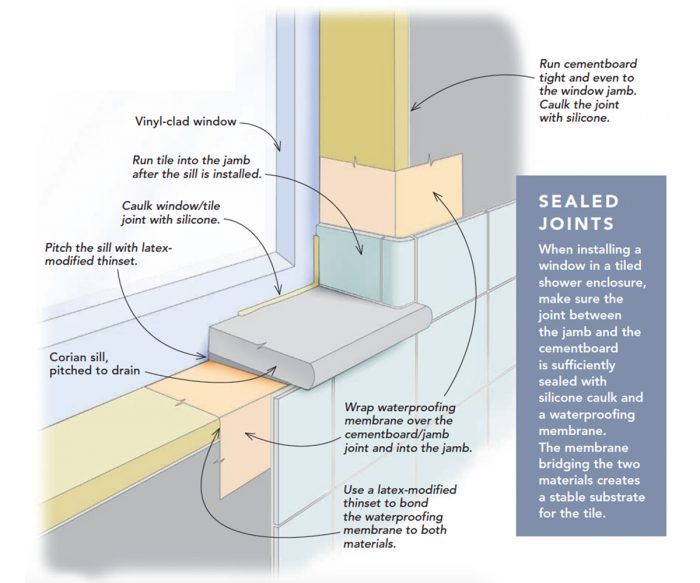
Shower stalls can be built out of concrete, ceramic tile or fiberglass panels. Concrete is the most durable option, but it’s also the most expensive because it requires pouring concrete over your floor before adding the other materials. Fiberglass panels are made from plastic and are easy to install and clean, but they’re not as durable as other options. Ceramic tiles are easy to install and clean because they don’t absorb water like concrete does. However, they’re not as durable as concrete or fiberglass panels and may crack if you drop something heavy on them.