How to build a shower stall with tile
Some people enjoy building their own shower stall from scratch, others hire professionals. In this article we will explain how to build a shower stall from scratch using
A shower stall can be built for a fraction of the price of buying one; even pre-formed stall kits can cost $2,000 or more, and your time building a shower from scratch is probably worth as much to you as it would cost. Building a shower from scratch can involve installing tile, coping trim, grouting tile and more. This article explains how to get the job done quickly, safely and cleanly
How to build a shower stall with tile
If you need to build a shower stall from scratch, you will need to first decide on the type of shower you want. If you are building a custom home, then you may be able to specify what kind of shower stall you want in the plans. If not, there are several types of showers that can be built from scratch. A custom built shower is often more expensive than the do-it-yourself option because it can take longer and require more expertise. However, it is possible to build your own custom shower without having any prior experience or knowledge of construction.
Building a Ceramic Tile Shower
A ceramic tile shower is one of the most common options for those who wish to build their own custom bathtub enclosure. These types of bathrooms tend to be very popular because they give homeowners an opportunity to express themselves through their design choices. They also work well with almost any style so they can fit in with just about any decorating scheme. When building a ceramic tile shower there are several factors that must be taken into consideration before making any decisions about materials or construction methods:
Size – It is important to know exactly how large your bathroom will be so that you can plan out how much space
The shower stall is the most important part of your bathroom and can make or break the look and feel of the entire room. If you are planning to build a new bathroom, one of the first things you need to consider is whether you will take the time and effort necessary to build a shower stall from scratch.
Building a shower stall yourself can be quite easy, as long as you have some basic carpentry skills and have access to some tools. Follow these steps below on how to build a shower stall from scratch:
Step 1: Measure the space
The first thing you will want to do when building a shower stall from scratch is measure the space where you want it built. You will want to make sure that there is enough room for all of your equipment and supplies. Do not forget about any pipes or electricity that may be in this area as well, as they must be accounted for during construction.
Step 2: Add walls
After measuring out your space, it’s time to add walls. The walls should go up around three feet high so that water does not splash out onto your flooring when taking showers. Make sure that there is at least five inches of space between each wall so that air does not get trapped inside them while taking showers or baths.
I decided to build a custom shower stall in my basement. It’s a single-wall design, meaning that the entire wall is covered with tile. This makes it easier to install than a conventional beadboard-style shower stall, which has seams where the panels meet.
The project required some carpentry skills, so if you’re not comfortable cutting and nailing wood, you may want to hire someone else to do it for you.
The first step was measuring and cutting all of the lumber. The floor frame consisted of two 2x4s running parallel to each other on top of 2×6 joists. The walls were built from 2x4s spaced about 16 inches apart — enough room for sheets of ¼-inch plywood between them.
After making sure everything was square, I installed metal plates along the bottom edge of each side piece so I could screw them together with L-brackets (which were attached to the plates using #8 x 1¼” screws). Then I slid ¼” plywood into place between the two sides, fastening it with more L-brackets at every joint.
The first step in building a shower stall is to decide how big you want it to be. The size of your shower will depend on the space available, your personal preferences and how much money you want to spend.
Showers come in many shapes and sizes, from small showers without doors to large walk-in shower stalls with multiple shower heads. You can also use glass or tile with a mosaic design that matches the rest of your bathroom design.
The next step is to install plumbing for the shower. You will need to install a hot and cold water supply pipe for each faucet, as well as a drain pipe through which water flows out of the shower when it’s not being used.
You should also install a drain cover in case there are leaks in your pipes or if someone accidentally drops something into the drain while they’re cleaning it out after use. If you don’t know where your drain lines are located, ask someone at your local hardware store for help finding them before continuing with this project.
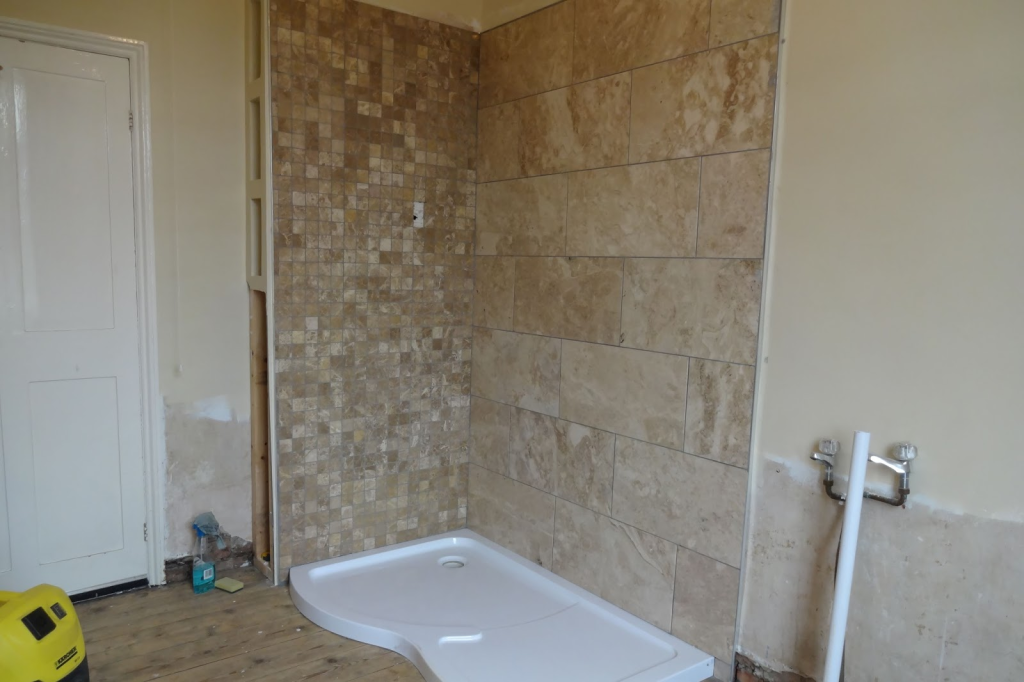
The best way to build a ceramic tile shower is with a concrete backer board and mortar bed. The backer board provides a solid surface for the tiles to adhere to, and the mortar bed creates a watertight seal between each tile.
The first step in building your own ceramic tile shower is to prepare the walls. If you’re working with existing walls, you’ll need to remove any old caulking or drywall. If not, skip this step and move on to installing your backer board.
Install the backer board by using masonry adhesive and attaching it to the wall with screws. Make sure all surfaces are clean and free of debris before applying the adhesive or fasteners.
Next, mix up some mortar (a mixture of cement and sand) and spread it over the entire surface of your backer board using a trowel or hawk. This will create a smooth surface for laying down new tile later on.
Wait at least 24 hours before continuing with this project so that the mortar can cure completely — don’t try filling any gaps before then!
How to Build a Ceramic Tile Shower
What You’ll Need:
Shower stall base and walls
Baseboard molding (wood or plastic)
Tray ceiling (drywall, wood or PVC pipe)
Ceramic tile (interior and exterior)
Grout, grout float and grout sponge
You can build a shower stall from scratch. You’ll need to decide on the size and shape of your shower, as well as what type of material you’re using for the walls and floor. Ceramic tile is a popular option for shower stalls because it’s durable, easy to clean and comes in an array of colors and styles.
Materials
You’ll need a few basic materials before you begin building. These include:
Shower pan liner. A shower pan liner is a waterproof membrane placed over a concrete floor before tiling begins. It prevents leaks and helps keep moisture away from the concrete surface below. The liner will also provide a barrier between the bottom of your tub and any moisture that might seep through cracks in the concrete surface. A preformed shower pan liner is available at home improvement stores, or you can make your own by lining a cardboard box with plastic sheeting before pouring in wet concrete mix (see Resources). The box should be higher than where you want your finished floor to be, since it will settle slightly over time — generally about 1/4 inch per foot of height above grade level (measured from ground level) — when it dries out fully (see Step 3).
Ceramic tile is an easy to clean material, but it’s not always the most practical. The tile can be slippery when wet and hard to clean when dry. For this reason, many people choose to use vinyl or laminate flooring in their bathrooms. However, ceramic tile showers are a popular choice because they can be customized to fit your style and budget. If you’re thinking of installing a new shower in your home, here’s how to build a ceramic tile shower from scratch.
Step 1 – Preparing the Area for Construction
Before you begin any construction work on your project, make sure that the area where you plan on building meets all requirements for safety and sanitation. Make sure that all electrical outlets and water pipes are easily accessible so that they can be moved if necessary. Remove any furniture or appliances from the room so that there is plenty of room for construction work without interruption.
Step 2 – Installing Shower Walls and Flooring
The next step is installing the walls and flooring for your new shower stall. Measure the dimensions of your space so that you know how much material will be needed for each section. Install drywall along one wall with screws every 12 inches apart and secure it
How to Build a Shower Stall from Scratch. Building a shower stall from scratch is not as difficult as it may seem. In fact, with a little bit of knowledge and the right tools and materials, you can build your own shower in no time!
The first thing you need to do is decide how big you want your new shower to be. Once you know this, you can start gathering the tools and materials that will be needed for construction.
Tools:
Hammer
Nails or screws
Electric drill with bits (for drilling holes)
Materials:
Wooden boards (1x4s work best)
Plastic sheeting or plastic tarp (to cover the floor)
Thin-set mortar (used to bond tiles)
Step 1: Cut and dry-fit the top, bottom and sides.
First, cut the pieces for the four walls of your shower stall using a circular saw. Use a table saw to rip the plywood sheets down to the proper widths. Then, dry-fit all four wall pieces together with glue and finishing nails. Don’t worry if there are gaps here and there; you’ll be able to fix them later on in this project.
Step 2: Install base molding.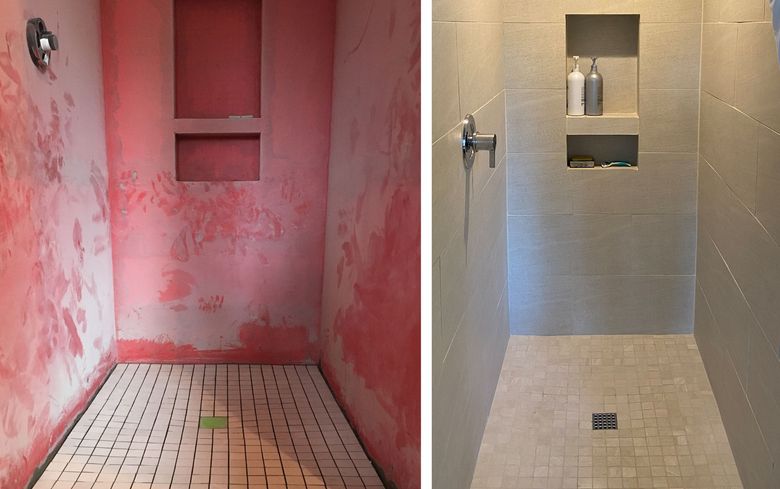
Next, install base molding on each side of your shower stall’s interior walls. This will help hide any gaps between the walls and floor as well as provide support for the tile flooring that you’ll install later on in this project. Cut each piece of base molding to length by measuring from outside edge of plywood wall panel through center hole (see diagram below). Attach each piece of base molding to plywood panel with finish nails driven through pilot holes drilled in top surface of base molding (toenail these into underlying studs).
Step 3: Install backer board and cementboard.
Use a hammer drill equipped with a carbide-tipped masonry bit to bore three holes in each side of your shower stall’s interior walls