How to build a outdoor shower
Building an Outdoor Shower is an easy do-it-yourself project. It will save you a lot of money and it can also add value to your property. If you want to know how to build an outdoor shower, the first thing you need to consider are the different designs.
Do you want to make a Outdoor shower, how to build an outdoor shower with hot water, how to make an outdoor shower with a hose? then you’ve come to the right place. Building an outdoor shower can be easy and quick as well. An outdoor shower is a great asset to have if you are into camping, and it is also very useful for cleaning up after gardening or messy cooking endeavors.
How to build a outdoor shower
If you want to improve the look of your home, building an outdoor shower is a great way to do it. It can be done in a weekend and be very inexpensive. There are many different styles of outdoor showers and this article will help you decide which one is best for your home.
A quick note about safety: If you’re going to install an outdoor shower, make sure that it’s safe for use by children and pets. A good way to prevent accidents is to put up a fence around it and/or cover it with some type of netting or screen.
How to build an outdoor shower with hot water
If you want to have the ability to take a warm shower outside, then this is the way to go. The hot water will be heated by either solar power or electricity (via propane). You’ll need some plumbing skills plus electrical work if you want hot water. Otherwise, just get cold water!
You can build an outdoor shower with hot water or a hose. The former is great for cold winter days or those where you need to use the shower for more than one person. The latter is a DIY project that is easy to assemble and takes up very little space.
Here’s how to build an outdoor shower with hot water:
1. Install a water heater in your garage or utility room. The tank should be large enough to supply at least three showers per day, but you can always add another one later if needed. If you don’t want to install a heater, consider using a tankless model instead.
2. Fill the tank with hot water from your household supply using an electric or gas-powered pump (available at hardware stores). You can also use propane tanks for backup power during outages or emergencies.
3. Run plastic pipe from the heater through the wall and into your house through a hole drilled through the exterior siding — this will allow you to hide the pipe from view once everything is installed inside the house. Use metal fittings instead of plastic ones, as they’re much less likely to crack under pressure from freezing temperatures (which can cause pipes to burst).
An outdoor shower is a great way to add value and usable square footage to your home. Not only will it provide a place for the family to wash off after a swim in the pool or beach, but it can also be used as an outdoor shower for pets.
There are several different types of outdoor showers that you can build, including one with hot water, one with cold water, and one that uses a hose. This article will explain how to build each of these as well as give you some tips on how to keep your outdoor shower looking good year-round.
How to build an outdoor shower
Outdoor showers are a great way to relax after a long day or just before bed. They can also be used as an alternative to bathing with hot water.
Here are some tips for building an outdoor shower:
Planning is essential – Before you start building, make sure that you have all the materials you need on hand and plan out how everything is going to fit together. You may even want to buy extra materials just in case something goes wrong during construction.
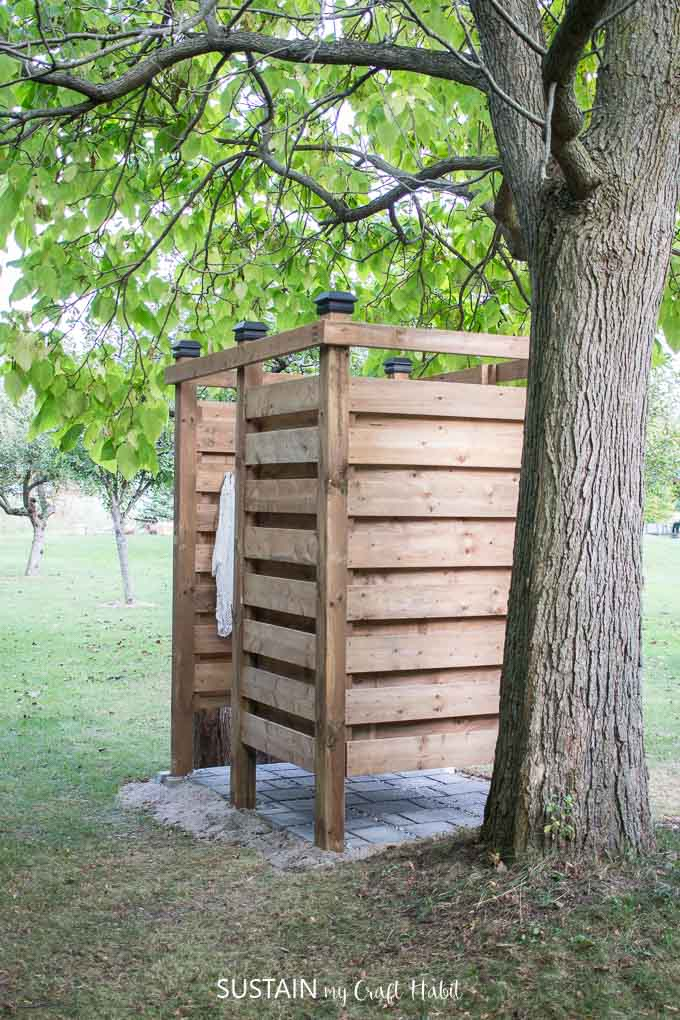
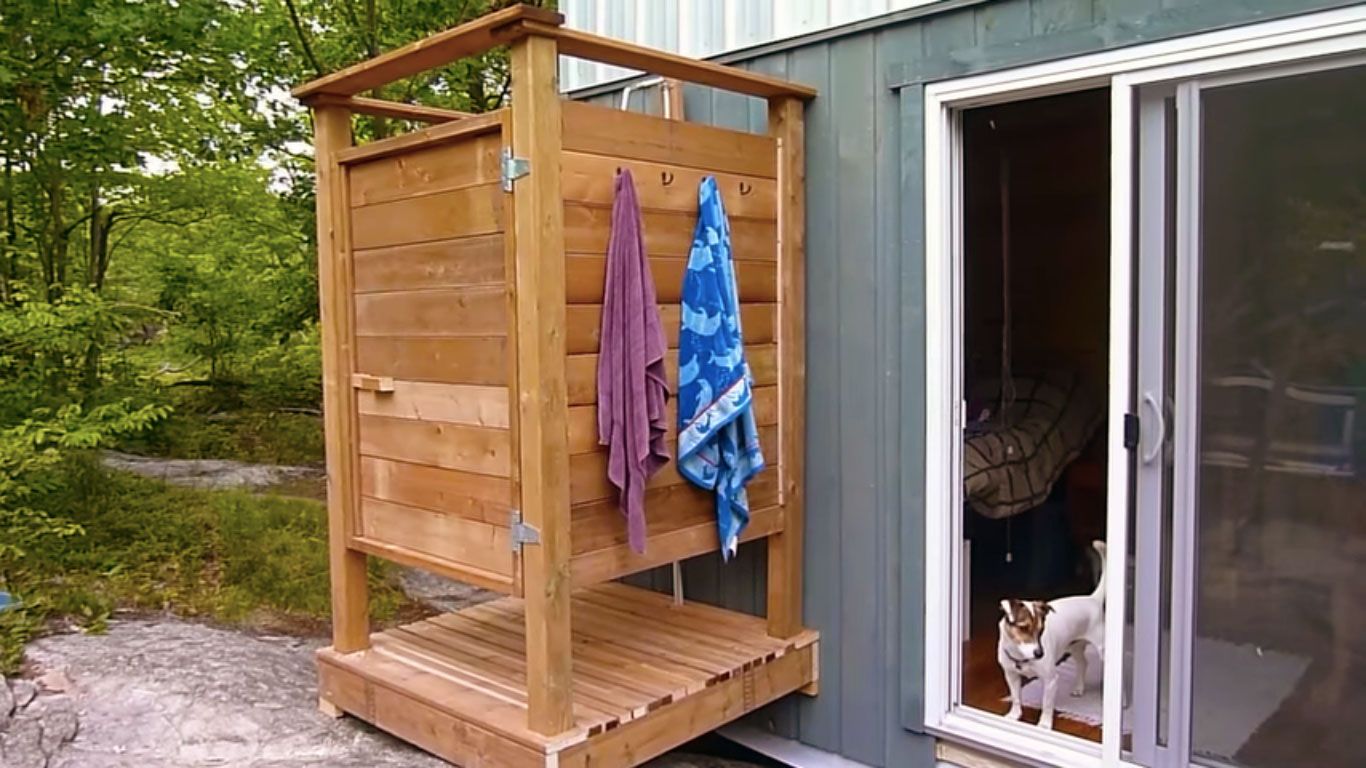
Measurements and layout – Measure the area where you want your outdoor shower to go so that you have a good idea of how much space it will take up and what type of layout works best with your home’s design and space limitations. Lay out all the materials needed in order so they’re ready when you need them, then begin constructing the frame from pressure treated lumber or cedar boards (if desired). Make sure that everything fits together properly before proceeding with further steps in construction!
Hot water system – If you want hot water running through your outdoor shower, then connect up a standard garden hose with rubber washers for leak-free connections then attach it to a hot water faucet inside your home (use only cold water
Outdoor showers are a great way to enjoy the warm weather and relax in your own backyard. They can be as simple as a bucket, hose and soap or as elaborate as a spa-like experience with all the bells and whistles. The good news is that you don’t need any special skills for this project — just some basic tools like a drill and saw, along with some patience and creativity.
To build your own outdoor shower, you’ll need:
A hose
A bucket or other container for holding water
Bricks or blocks to support the bucket
A drill, screwdriver, hammer and saw (optional)
Step 1: Choose Your Location
Decide where you want your outdoor shower and make sure there’s room for it. If you’re building on an existing deck or patio, make sure there’s enough space between surfaces so that water doesn’t leak through cracks. If you’re building into a hillside or embankment, make sure there’s enough room for drainage under the shower area.
Step 2: Attach Your Hose To The Water Source And Fill Your Container With Water
Attach one end of the garden hose to your outdoor faucet or spigot using a clamp or cinching device (see Resources below).

How to build an outdoor shower with hot water
You can build a simple outdoor shower with a garden hose and a few other supplies. If you’re looking for something more elaborate, you can build a shower stall with hot water and even add a heater for those cold winter mornings.
If you have a small yard, consider using the space in another way. For example, if you have a small backyard but want to grow vegetables or raise chickens, consider using your backyard as an outdoor kitchen instead of an outdoor shower. Build yourself a little shed or cabin to store your tools and supplies so that they don’t take up space in the house.
Some people like to build their own outdoor showers because they are easy to use and affordable compared to traditional indoor bathrooms. You could even use an outdoor shower as part of your camping gear so that you don’t have to use one at campgrounds or public parks when traveling.
A hot outdoor shower is a great way to start the day, and it’s also a great way to end it. With hot water running through the pipes all day, you can have an outdoor shower at any time of day or night. And if you’re going to be using this feature regularly, it pays to invest in a high-quality system that will last for years.
Outdoor Shower Plumbing
The first thing you need to do is install your plumbing. You can use regular indoor plumbing for this, but you’ll still have to install some extra piping and hardware so that you can get the water from inside your house out into the yard. The easiest way to do this is by installing a cold water supply line that runs all the way out to where you want your shower head to be located. Then, when you want to take a hot shower, simply turn on both valves and let the cold water run down until it gets hot enough (or just add some heat if needed).
How to Build an Outdoor Shower
An outdoor shower is an excellent addition to any backyard. It’s a great way to clean off after playing in the yard and can also be used as a watering station. An outdoor shower can help you keep your lawn and garden looking great by removing dirt and debris from shoes, clothing and skin. Outdoor showers are easy to install, making it possible for anyone to install one in their backyard or garden.
Step 1 – Decide on Location
If you want to use the shower during the winter months, make sure that there is enough space around the drainpipe so that it does not freeze when temperatures drop below freezing. You also need enough room around the drainpipe so that you can easily access it when needed. If you plan on using the outdoor shower during warm weather months, choose a location where it will get plenty of sunlight so that algae does not grow inside of it. Choose a spot that is close enough to the house so that you do not have far to walk with wet feet if needed.
Step 2 – Clear Area Around Drainpipe
Clear out an area around your drainpipe where you want your outdoor shower to go.
The first step in building an outdoor shower is to determine the location. Consider how much space you’ll need and where you’ll want the water to drain. You’ll also need to consider how you will get water to your outdoor shower. If you already have a garden hose and are just looking for an attractive way to use it, you can build a simple design that doesn’t require any power tools or plumbing connections.
If you want a more elaborate system that includes hot water, however, then you’ll need to install a pump and some PVC pipe.
For this project we used:
• 1/2-inch PVC pipe
• 1/2-inch PVC fittings (couplings, elbows)
• PVC primer & cement (optional)
• Flexible PVC coupling (optional)
• Cable clamps (optional)

How to Build an Outdoor Shower
Building an outdoor shower is something you can do yourself. It doesn’t take much skill or experience, and with the right materials, you can build your own shower in just a few hours.
The first thing you need is a spot to put your shower. This could be as simple as a patch of grass in your backyard or as elaborate as a raised platform with built-in benches. The important thing is that whatever surface you use must be able to withstand water and sun exposure without rotting away.
Once you have your spot picked out, you’ll want to build some sort of frame for the shower itself. This can be made from wood or metal piping — whatever works best for you and your budget. One popular material for this frame is PVC pipe because it’s easy to cut, inexpensive and available in many different sizes and shapes. You might also want to consider using hot water pipes as part of your frame since they’re already insulated with heat tape and pre-drilled for easy installation of faucets, handles etc.