How to build a small kitchen island
A small kitchen island with seating is quite a valuable addition to your existing one that can help you add some extra counter space or incorporate additional storage. Not only will you learn how to build a small kitchen island, but we will also show you how to build a kitchen island with cabinets, and even if you have limited tools and budget available – we have solved this issue for you as well.
The kitchen island is the heart of any home. It’s where families gather, recipes are shared and meals are made. But what do you do if a traditional island doesn’t fit into your tiny condo or skinny kitchen? Of course, you build a different type of island! And we’re here to show you how. To build a small kitchen island with seating and storage, you’ll need the following supplies.
How to build a small kitchen island
The kitchen island is one of the most versatile pieces of furniture in your home. It can be used as a countertop, dining table, desk, or even a bar. Because of this, it’s important to keep your island as functional as possible.
There are many ways to build an island depending on its size and purpose. This article will show you how to build a small kitchen island with seating, cabinets and drawers. The same principles apply for any type of kitchen island you want to build.
Materials
Some basic tools
Step 1: Measurements & Layout
A small kitchen island is a great way to expand your cooking and food prep area. They’re also a great place to sit down and eat if you don’t have a formal dining room.
This article will show you how to build a small kitchen island with seating, cabinets and drawers.
Materials:
1 sheet of plywood
3/4″ plywood or particle board (for the top)
3/4″ x 4′ x 8′ pine boards (for the legs)
2 3/4″ screws (for attaching legs)
2 1/2″ screws (for attaching top)
How to Build a Small Kitchen Island with Seating
A kitchen island is one of the most common and practical additions to a kitchen. It provides extra counter space and storage, which is especially helpful for small kitchens. A kitchen island can also be used for seating during dinner parties or as an additional workspace during busy times of day.
Building your own kitchen island is easier than you might think. You don’t need any special skills or equipment — just some basic carpentry tools like a hammer, saw and screwdriver. And if you’re not confident in your carpentry skills, there are plenty of tutorials online that will show you step by step how to build one of these lovely pieces of furniture in no time!
A kitchen island is a great way to add additional work space, storage and seating. The following steps will show you how to build a small kitchen island with seating.

To begin, lay out your materials and gather any tools you’ll need. You’ll need lumber for the smaller pieces of your kitchen island and larger items like the cabinet doors and drawers
Next, cut your 2x4s into 4-foot lengths using a circular saw. These will be used for framing the sides of your kitchen island. Cut 2x4s into 3-foot lengths for the legs of the island.
Lay out the 4×8 sheet of plywood on top of two sawhorses or other temporary supports at least six feet apart so that it’s supported at both ends (if possible). Place one leg on each side of the sheet of plywood and trace around them with a pencil or marker. Use these outlines as guides when cutting out holes for mounting hardware as well as countertop support blocks on both sides of the plywood (one hole per side). Make sure that all holes are centered on each side; they should be equally spaced from both ends and corners.
Use a drill/driver to drill pilot holes through both sides at each corner location
If you’re looking for an easy DIY project, building a kitchen island is the perfect weekend project. You can make your own countertop, add storage and seating, and even build in a sink. Here are some tips for how to build a small kitchen island:
1. Measurements
The first step is to measure and plan out your space. Make sure you have enough room for your island before buying any supplies or starting construction. You’ll also want to consider how much storage you want on your island and whether or not you want seating options such as bar stools or chairs with arms.
2. Materials
You’ll need a good amount of materials for this project including plywood, lumber, screws, nails, hinges and other hardware pieces, but the actual cost will vary depending on what materials you choose as well as how big your kitchen island is. For example, if you want to add cabinets to your countertop then this adds more cost because you have to buy all the materials separately (cabinets, doors etc.). However if you just want an open countertop then it’s cheaper!
Step 1:
Measure the cabinet space. Determine the size of your small kitchen island with seating, and then measure the space available in your kitchen. You will need to know how much room you have to work with and what measurements are needed. You can use a tape measure to determine this.
Step 2:
Decide on the materials that you want to use for your small kitchen island with seating. If you have woodworking experience, you may want to build it from wood. If not, there are many other materials that can be used for your small kitchen island with seating. For example, metal is another option that is popular because it does not cost as much as wood but still looks nice and can be built easily by anyone who has some basic building skills and tools.
Step 3:
Build your small kitchen island with seating out of whatever material you choose by following the instructions in the next steps below!
When you’re building a small kitchen island, you want to make sure it’s functional and fits in with the rest of your kitchen. This is a great place to put extra seating or storage. Here are some tips for planning and building a small kitchen island so that you have everything you need.
Designing Your Kitchen Island
The first step in designing your kitchen island is figuring out what it’s going to be used for. Do you need extra seating? Or would you rather have storage space? You may even want both! If you have limited floor space or countertop space, consider using cabinets on top of the island instead of seating. That way, at least one side will provide extra storage while still being useful as an eating surface.
Building Your Small Kitchen Island
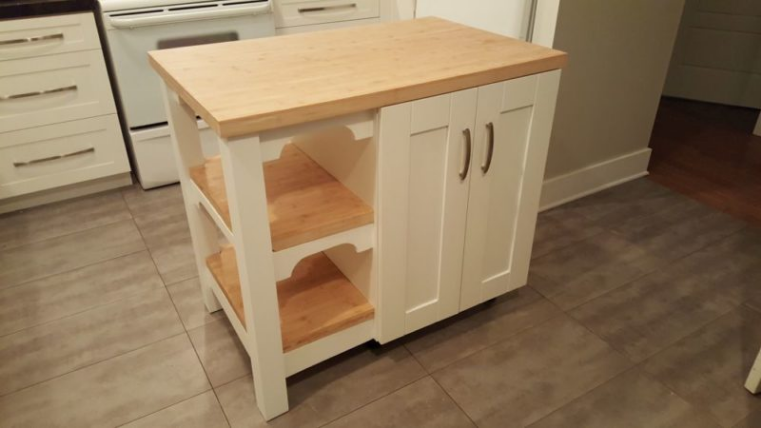
Building your own small kitchen island is easy once you know what materials to use. Basically all you need are four posts (or legs) and two sides made out of plywood or particle board cut to size. Attach the legs together using screws and then attach them to the side panels using pocket holes drilled into the post ends and secured with screws from below the panel edge. You can even add cabinet doors if desired!
In this article, I will show you how to build a small kitchen island with seating for your kitchen. A kitchen island is a great way to make your kitchen more functional and comfortable. Here are some of the benefits that you can enjoy from a kitchen island:
It serves as an extra counter space where you can prepare food, store pots and pans, or set the table
It provides extra storage space to keep your dishes, cups and other things
It offers you somewhere to sit while eating or doing other things in your kitchen
You can customize its size according to your needs
A kitchen island is a great addition to any home and can be used as an extra work surface, dining table, seating area, or even a stage for your karaoke machine.
There are many ways to build an island, but today we’re going to focus on how to build a small kitchen island with cabinets.
This project is simple enough that anyone can do it, but it will still look great.
Materials Needed:
– Plywood sheets
– 2x4s or 2x6s (depending on the height of your cabinets)
– 1x4s or 1/2″ MDF (depending on width of your cabinets)
– 3/4″ plywood for drawer bottoms and tops (optional)
Here’s an easy way to add a little extra seating to your kitchen. The design is simple and inexpensive, but the results are surprisingly elegant.
Here are the supplies you’ll need:
2×6 boards with 36-inch lengths (1 for each side)
3/4-inch plywood with 48-inch lengths (2 for each side)
1/2-inch plywood with 18-inch lengths (4 for each side)
1/8th inch thick plywood with 12×12-inch squares (8 for each side)
3/4-inch plywood with 12×12-inch squares (8 for each side)
1 1/4 inch screws (#8 x 3 inches) or 3 inch deck screws
Stain or paint of your choice