How to build a smoke pit
how to build a smoke pit how to make a bbq pit in the ground. how to build a bbq pit with bricks. Learn how to build an outdoor smoke pit today. Enjoy numerous smoked meats and save money by not paying expensive restaurant bills. Start planning, building and smoking!
One of the most daunting things I had to learn how to do as a fairly adventurous person was building a barbecue pit in the ground. My fears weren’t allayed even when I came to realize that making a barbecue pit doesn’t require welding or other, more difficult talents. In fact, it’s quite simple and enjoyable with nothing more than some basic tools and a bit of know-how. Below, you’ll find some tips for creating your very own barbecue pit in the ground or using bricks (and yes it will be just as good).
How to build a smoke pit
First, you should have a good idea on how to build a smoke pit. If you don’t have any idea about it, go through this article. Here we will discuss how to make a bbq pit in the ground.
To make a smoke pit, first you need to prepare the materials needed for this project. You will need bricks, mortar and cement. After that get your hands dirty and start constructing it as per your imagination or design.
BBQ pits are great for outdoor entertaining. They can be used as a gathering place for friends and family, or they can just be a way to cook up some tasty food on a nice day.
You can build your own BBQ pit in just a few hours. It’s easy to do and it will give you a lot of satisfaction when you’re done.
The best thing about building your own BBQ pit is that there are no limitations on what you can make it out of! You can use brick or stone, metal or wood…the sky’s the limit!
Here’s how to make a BBQ pit in the ground:
1) Dig out an area that is large enough for your desired size of BBQ pit, deep enough so that your fire will burn well but not too low so that it is too close to ground level where it may catch on fire easily or get muddy easily from rain/water runoff during rainstorms or heavy downpours.
2) Lay out bricks or stones around the inside perimeter (outside edge), leaving an open space in the middle where you’ll build your fire pit with bricks/stones/bricks/stones…etc…until it reaches your desired height (make sure there’s enough room between each brick/stone
The best way to make a pit is with bricks. It’s easy, cheap and looks great.
You will need:

-Bricks
-A level surface where you want the pit
-Soil (enough to fill the pit)
Step 1: Find an appropriate place for your pit. You want it to be in an area that gets lots of sun and shade, but not too much wind.
Step 2: Lay out your bricks in the shape of an octagon (8 sided shape). Make sure all the bricks are level with each other and that there are no gaps between them. If there are gaps, fill them in with soil or sand until they are even with the rest of the bricks. You can also use mortar to fill any gaps if you’d like, but it’s not necessary if you’re using new bricks.
Step 3: Dig a hole in between two bricks so that it goes down into the ground about 12 inches deep and then fill it back up with soil to create a ledge inside your octagon shape so that when you put your grill on top of it, it doesn’t sink into the ground too much but still has enough room underneath for hot coals to burn away from food as well as allow for smoke
How to build a smoke pit
A great way to add some character to your backyard is to build a smoke pit. It’s also a great way to get in touch with your inner caveman or woman.
Smoke pits can be made from almost anything, but we’ll be focusing on how to make one out of bricks. Here are the steps:
Step 1: Prepare the area where you want the smoke pit built. Remove any grass or weeds and dig an 8-inch hole for each brick (or whatever material you use). Make sure that there is at least 3 feet of space between each brick or whatever material you use. Lay out the bricks so that they create an even circle around the hole.
Step 2: Fill in around each brick with concrete until it is flush with the top of the ground. Let this dry overnight before proceeding with step 3.
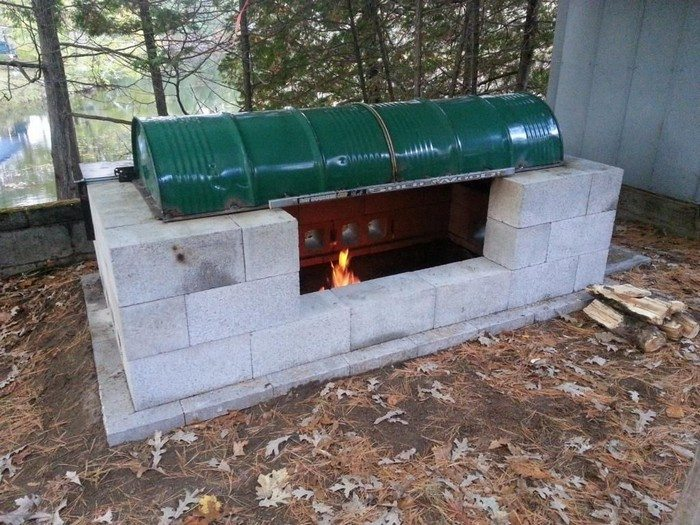
Step 3: Place firewood into the hole until it reaches just above level with the top of the ground (see photo). You can also place other things inside like rocks or pieces of metal if you want more weight on top of your firewood so that it stays inside when burning at night (see photo). This will also help keep animals away from your fire!
A smoker pit is a great addition to any backyard. It’s not just for smoking meat; you can use it to slow cook any type of food, from vegetables and fruits to whole chickens and other meats. The best part about building your own smoker pit is that you can customize it exactly how you want it.
Here are some tips on how to build a smoker pit:
1) Pick the right location for your smoker pit
2) Choose the right materials
3) Prepare the site
4) Build the firebox
5) Build the cooking chamber
how to make a bbq pit in the ground,
This is a simple and easy way to build a brick BBQ pit that requires no mortar or cement. The bricks are held together by gravity alone, but some cement can be added if desired. This will give you a solid foundation for your grill, but if you want something more permanent then use concrete instead of bricks.
Materials:
Bricks (or concrete blocks)
Sand or dirt
Mortar (optional)
Make a BBQ Pit with Bricks
Materials:
-bricks
-sod or dirt to cover the bottom of the pit (approximately 4 inches)
-grill grate (optional)
Instructions:
1. Dig a hole in the ground that is deep enough to hold your grill grate, plus an inch or two more for extra depth. This will prevent your bricks from falling in on top of your food.
2. Line the bottom of your pit with sod or dirt about 4 inches thick. This will keep your bricks from getting too hot, and also make it easier to clean out any ash that falls through the grill grates later on down the road.3. Start building up sides using bricks laid side by side horizontally until you reach your desired height. You can use as many bricks as you like, but remember that this will be an outdoor structure built mostly from clay so it may need extra support depending on climate conditions where you live (i.e., windy areas may require more reinforcement).
How to Make a Brick Oven
Step 1: Build a Foundation for the Oven
The first step in building your brick oven is to build a foundation for it. This can be done by digging down into the ground, or by using concrete blocks as a base. The size of your foundation depends on the size of your oven and how much room you have available. A good rule of thumb is to make sure that there is at least one foot of space between the top of your foundation and the ground level.
Step 2: Place Concrete Blocks on Top of Your Foundation
Once you have built your foundation, place concrete blocks on top of it. The number of concrete blocks depends on how tall you want your oven to be. For example, if you want an eight-foot-tall oven, then you would need 16 blocks stacked together to reach this height. Remember that these should all be placed directly over top of each other so they are secure in place while they’re being built upon later on.
Step 3: Shape Your Brick Oven With Mortar
Next, take some mortar and spread it on top of each block so that all sides are covered completely with mortar. This will give them more strength and stability when
Barbecue pits are made in many different ways, but the simplest and most common way is to dig a hole and line it with bricks.
The first step is to find a location on your property where there is no underground water or gas lines. You need to do this because you will be digging into the ground and the last thing you want is for your pit to explode. Once you have found an area that is safe, begin digging out a square or rectangular pit in the earth. Make sure that the pit is deep enough so that when you place your bricks inside, they will be level with the ground around them.
Once you have finished digging out your pit, cover it with an even layer of gravel or sand at least two inches thick. This will help keep any moisture from seeping through into your barbecue pit, which could cause it to crack or collapse over time.
Now that your pit has been prepared, place some concrete blocks around its perimeter so that they create a wall between 2 and 4 feet tall (depending on how tall you want your walls). Fill in between these blocks with more gravel or sand until they are secure against each other
Building a BBQ pit is a great weekend project. It’s a lot easier than you think, and you’ll be the envy of your friends and neighbors. Here are step-by-step instructions for building a brick BBQ pit.
First, let’s consider the materials you’ll need:
Bricks (about 25 per square foot) – I used “brickettes”, which are pre-cut into 2-inch by 4-inch bricks. This made it easier to measure out equal amounts of brick without worrying about cutting them in half or breaking them on accident. If you want to use real bricks, there’s no substitute for measuring out every single one yourself!
Mortar mix – The mortar mix should be made up of 1 part cement, 2 parts sand and 1 part Portland cement water. The water acts as an adhesive, allowing the mortar to stick better to the brick and make a stronger bond between brick and mortar. You’ll only need enough mortar mix to fill all of your joints (the space between each row of bricks).
Grout – The grout can be any color you like! I chose gray because it matched my patio pavers perfectly!