How to build a dam in minecraft
Building a small dam in minecraft is a great way to bring out your inner engineer. The first thing you will want to do is choose a location to build the dam. You can build it anywhere and your biggest concern should be water resources. Once you have chosen a location and have started building the dam, early warning systems are also very important. The last thing you want is being flooded, which is why I recommend building an early warning system with pressure plates and redstone torches.
Building a small dam in minecraft is a great way to bring out your inner engineer. The first thing you will want to do is choose a location to build the dam. You can build it anywhere and your biggest concern should be water resources. Once you have chosen a location and have started building the dam, early warning systems are also very important. The last thing you want is being flooded, which is why I recommend building an early warning system with pressure plates and redstone torches.

How to build a dam in minecraft
In this article I will tell you how to build a small and simple hydroelectric dam on your plot of land.
First of all you need to find an area where the water flows and make sure that there is enough water there for you to use for your needs. Then, you need to find two hills, which are close together but not connected. These hills should be in a straight line from top to bottom so that when you build them up, they will form a wall across the stream. After that, dig out the sides of both hills until they are flat on top. Next, fill up the gap between both sides with cobblestone or any other material you feel comfortable using at this point. Then add some blocks underneath the whole structure until it reaches the same height as before you started digging out dirt from underneath it’s base (this will give it extra stability). Finally place some stairs on each side of your new dam so people can enter and exit without falling into water while doing so!
How to build a small dam in Minecraft. This is a tutorial on how to build a small dam in Minecraft.
How to build a hydroelectric dam in Minecraft. This is a tutorial on how to build a hydroelectric dam in Minecraft, which works with Redstone and Water.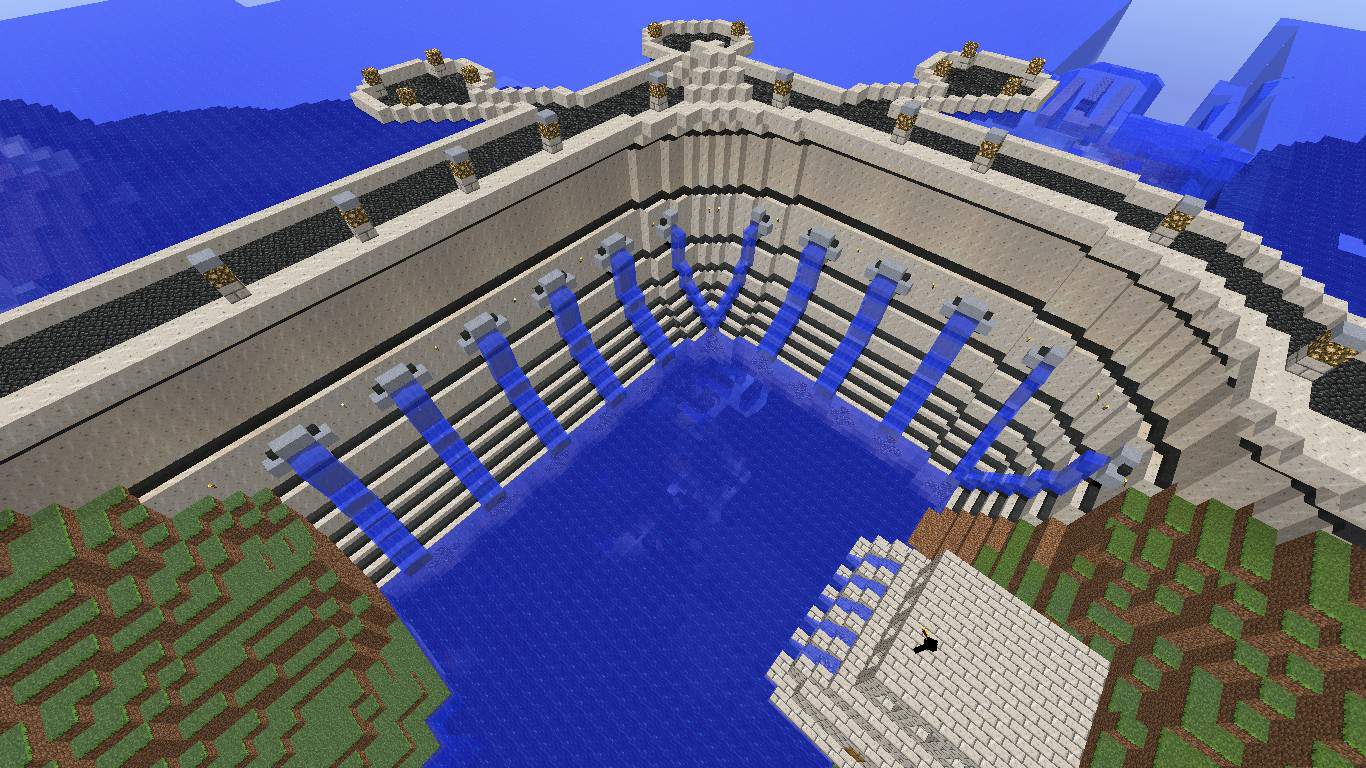
In this tutorial we will be making two different types of dams; the first type of dam is the one that keeps water from flowing through the river, while the second type of dam is used to generate power using Redstone and Water.
I will use screenshots to show you how I built them, but if you have any questions feel free to comment below!
How to build a small dam in Minecraft
A small dam is an easy construction that will help you to build a reservoir for your home. It is also possible to use the small dam as a hydroelectric generator.
To build a small dam, you need to find a place where there is water flowing from one place to another. This can be done by digging two tunnels at right angles on both sides of the river, so that when you connect them, they will form a square shape with water flowing through it.
Once you have found such a spot and dug out the square, fill it up with dirt or sand until it becomes solid and not flimsy anymore. To make sure that the water flows through this structure, dig out some more space beneath the structure and fill it up again with dirt or sand. This way, the water will flow through this little tunnel without getting stuck anywhere along the way!
You can also use this structure as a hydroelectric dam! Just like any other hydroelectric dam, you need to build it in such a way that there is enough fall between two lakes/rivers/etc. so that when water flows from one place to another, it creates energy which can then be used for electricity generation!

This tutorial will show you how to build a small dam in Minecraft. This is a simple tutorial that can be done by anyone, even beginners or kids. The dam is made out of cobblestone and stone bricks, which are easy to make and are cheap to buy. It’s also very sturdy and can withstand a lot of water pressure.
Materials:
Cobblestone (or any other type of stone)
Stone Bricks
Water
There are three main types of dams:
A gravity dam is a structure that holds back water with the force of its weight. Gravity dams are built across rivers and valleys, where the weight of the water compresses the earth below it. Gravity dams can be made out of rock, concrete or masonry.
A buttress dam is a curved dam designed to resist pressure exerted by water in its core. Buttress dams are built along steep mountain sides and have numerous buttresses to help resist pressure from the water. They can also be arched or curved to withstand pressure from inside and outside the structure.
An arch dam is curved like an arch and relies on its shape for support. Arch dams usually span narrow sections of rivers or valleys and often need buttresses in order to provide stability against erosion from wind or water flow.

In this post, I will show you how to build a small dam in Minecraft. A small dam is the easiest way to make your own power plant!
First of all, you need to find a place where you can build the dam. This should be a river or a waterfall. Make sure that there are no trees nearby, because they could get damaged by the water flow. If there are any trees around, you can use them as support for your dam.
Now we need some materials for building this small dam: Diamond Pickaxe for mining some stone blocks; Water Bucket for filling up holes and making water flow faster; Shovel for digging out dirt; Pickaxe for mining other materials like stone or dirt; Torch for lighting up dark areas; Redstone Torch for powering redstone devices such as dispensers; Redstone Repeater (optional); Stone Slab (optional); Ladder (optional).
Start by digging out two blocks underneath the water source so it flows into them immediately instead of flowing slowly into the ground first before coming back up again at another location far away from the original source
The water level can be lowered in the Minecraft world by building a small dam. This will allow the player to create lakes, rivers and ponds where they want them. The dam itself can be built out of any material but usually stone or sand. The material used is less important than how you build it.
The first step is to select an area for your dam that is not going to be covered by water later on. You can use any type of building blocks for this but it’s best if you use ones that are easy to find in the world at large, such as dirt or cobblestone. A good place to start is at one end of your lake or river and building from there towards another land mass like a mountain range on the other side.
Place water source blocks into a line across from one end of your lake/river and then add stone or sand blocks on top of them so that they form a solid wall with no gaps in between them. If there are gaps then you’ll need to fill them up with more blocks until there are no gaps left at all.
You can now start filling up these walls with water source blocks again until they reach ground level at both ends of your
In this tutorial, I will show you how to build a small dam in minecraft. This is an easy tutorial that can be done by anyone. If you have any suggestions or questions, please leave them below.
You will need:
A bucket of lava
A bucket of water
A water source block (the ground)
First make sure you have some lava and water nearby. You also need a block of dirt/grass/sand/stone as your base material. For this tutorial, we’ll use sand. Now make sure the water is flowing into your new structure by placing a block of dirt next to it so that it turns into grass or cobblestone when wet. Place the lava at one end of your base material then pour the water on top of it until it flows over the edge on one side. Now take out your pickaxe and break out a hole around this point where the lava meets grass/cobblestone so that there is no grass/cobblestone there anymore just bare sand or cobblestone flooring where there used to be grass or cobblestone before we put our dam together! The reason we don’t want
In this tutorial I will show you how to build a small dam in minecraft. This is an easy project that you can do as a beginner. The materials needed are sand, stone, and water.
The first thing you need to do is make a small tower of sand blocks. Make sure the tower is about 6 blocks high and about 2 blocks wide. Once your tower is made go ahead and make it into a staircase shape so that it looks like this:
Next get your water bucket and fill up the left side of your staircase with water until it reaches the top of the stairs. You should end up with something like this:
Now go back down your staircase so that you are standing on top of solid ground again. Now take some redstone dust and place it down in front of each stair so that when you walk over it, it will power up all the redstone behind it (like in real life). If done correctly then when you walk over one side of your stairway (the top), it will power up both sides!
If you have a stream or river in your Minecraft world and you’d like to build a water mill, here’s how you go about it.
1. Find a place with a nice flowing river or stream. It can be anywhere, but it has to have enough water flowing through it to make the mill work.
2. Dig out a hole in the side of the river or stream that is at least 3 blocks deep and as wide as you want your mill to be (4 blocks wide will give you more space for your machinery).
3. Place some water inside this hole until it fills up all the way to the top. Then place any kind of block at the top so that it forms a dam like this:
4. Now dig out another hole next to this one and fill it up with water so that there is no source of air at all under your dam:
5. Now look down into the first hole where our dam is and we’ll see that there are no sources of air coming from under our dam:
6. Cover up all sides of this first hole with any kind of material you want, then fill up another 3 blocks above where our first