How to build a concrete foundation
Building a concrete foundation for a shed or other structure is typically desired when the ground under the shed is subject to flooding or other types of water saturation. The need for a solid concrete foundation in such cases is to protect the framework of the shed from water damage.
Concrete foundations for sheds are built the same way a poured concrete foundation for a house is built, but only on a smaller scale.
How to build a concrete foundation
How to Build a Concrete Foundation for a Shed. This guide shows you how to build a concrete foundation for a shed from scratch. It’s not too difficult, but it does take some time and patience.
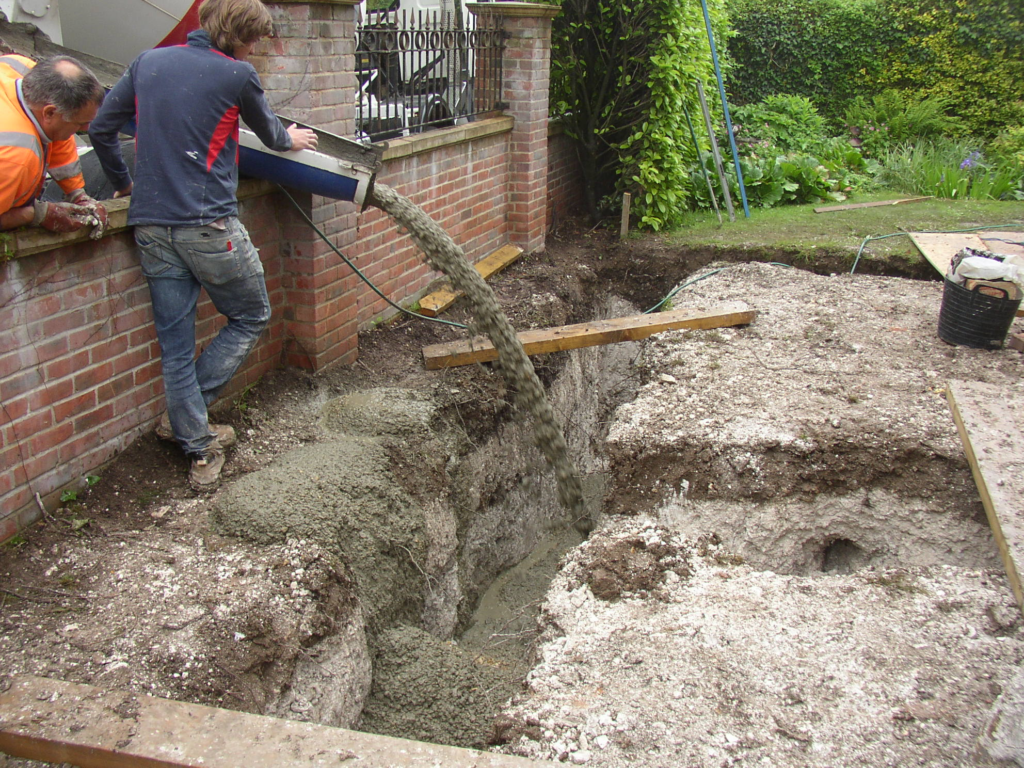
Step 1: Dig the Hole
Start by digging out the hole where your shed is going to sit. You need to dig down at least 6 inches so that the concrete will be able to support the weight of your shed. If you’re using a pre-made wooden frame then you’ll need to dig an extra 2 inches so that the top of your frame is at ground level (if not higher).
Step 2: Put in Footings and Anchors
To make sure that your shed doesn’t move or crack over time, you’ll want to install footings and anchors into the ground before pouring your concrete floor. Footings are large blocks of concrete that go into the ground under each corner of the building so that it has something solid on which to rest. Anchors are pieces of rebar which go into holes drilled into each footing and through the slab itself – this makes sure that there are no weak spots in your floor where it could crack or break up over time if there were no anchors present
Concrete is one of the most versatile building materials available. It is strong and durable and can be used to build everything from foundations to driveways.
Concrete is made of three main ingredients: cement, sand, and water. Cement is a powder that hardens when mixed with water. Sand provides strength and texture to the concrete. And water acts as a binder and helps make concrete easy to spread onto flat surfaces.
You can build a concrete foundation for a shed with masonry blocks or bricks placed on top of one another in a pattern called “coursing.” The size of your blocks will depend on how large you want your shed to be, but typically they are between 2 feet (0.6 meter) and 4 feet (1.2 meters) long and about 1 foot (30 cm) wide. You’ll need enough blocks for each side of your shed plus some extras for steps if you plan on having any steps leading up to the door or window openings in your shed’s foundation wall. However, if you don’t need any steps, then you won’t need any extra blocks; just make sure there are enough blocks total so that they cover all sides of the shed’s footprint when they’re laid out in coursing patterns
Building a concrete foundation is a job that can be done by anyone, but it is important that you have the right tools and materials on hand. A concrete foundation will last for decades if you take the time to build it properly.
/cdn.vox-cdn.com/uploads/chorus_asset/file/21886382/iStock_996232320.jpg)
The first thing you need to do is choose where you want your shed or other building to go. This will require some careful planning because you need to consider how much space there is and how close buildings can be. For example, if your house has an attached garage then this may limit where you can place your shed. If not, then make sure that there is a power outlet nearby so that you can run electricity into the shed as well as water and drainage pipes. Make sure that there are no trees growing too close to where you are building and check for any underground cables before digging up the ground. If in doubt, call up your local council or utility company and ask them about these things before starting work on your project.
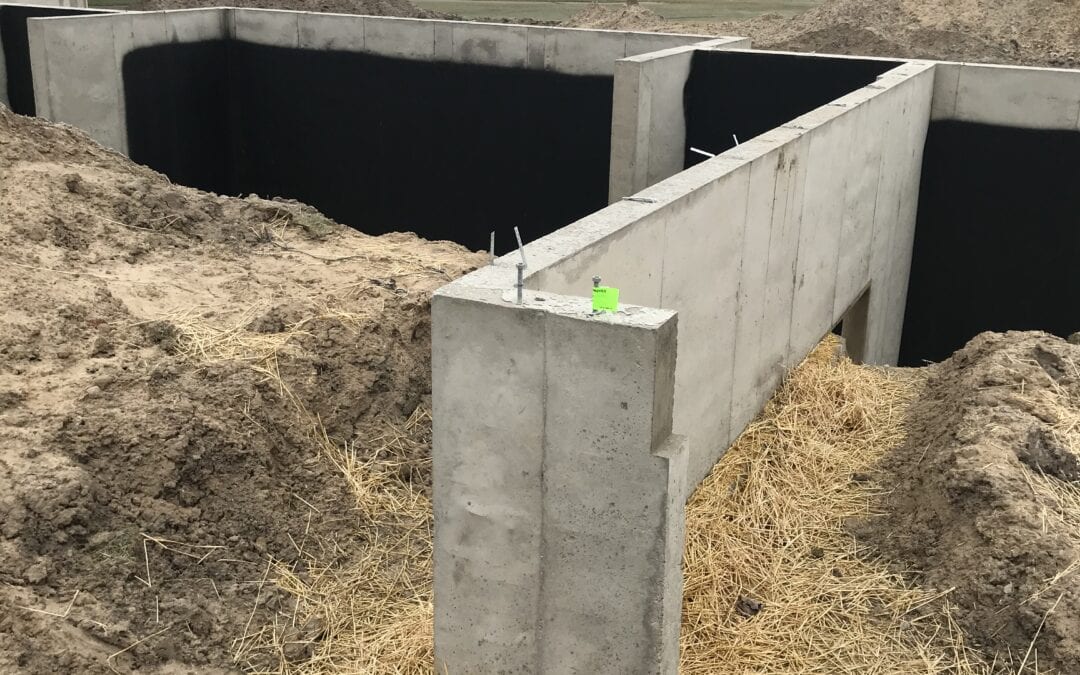
A concrete foundation is an important part of any structure. A concrete foundation provides a solid, permanent base for a building that can withstand the elements and provide years of reliable use. Concrete foundations are typically poured in place, but it is possible to lay them on top of another existing surface.
In most cases, you’ll need to hire a professional contractor to pour a concrete foundation in your yard. However, if you’re building a shed or other small structure on your property, you may be able to do this yourself with some simple tools and materials.
Step One: Determine if You Need a Concrete Foundation
Before deciding whether to pour a concrete foundation or not, consider what kind of structure you’re building and how much weight it will carry. For example, if you are building a shed or small outbuilding that will only hold up to 200 pounds or so, then there is no need for a concrete foundation; just use some treated lumber for the frame and build it directly on the ground.
However, if you are planning on building something larger such as a garage or storage room that will have more weight than this, then it’s best to build it on top of a concrete slab so that it doesn’t sink into the ground over time from all
Concrete foundations are common in commercial and residential building. They are used for both new construction and additions to existing buildings. Concrete foundations can be poured on top of existing concrete slabs or poured directly on the ground.
Concrete is easy to mix, easy to pour and inexpensive. It’s also strong enough to support many different types of structures. However, concrete does not expand and contract as wood does, so it needs to be sealed properly for best results.
If you’re building a concrete foundation, here’s what you need:
A level, flat site that drains well. The site should be located away from trees or other obstacles that might cause drainage problems later on.
Plenty of water – 2 gallons per cubic yard of concrete mix (one cubic yard equals 27 cubic feet). If you have access to a hose bibb or hydrant at least 25 feet away from your site, use that rather than bringing water in buckets or cans — it will save time. You’ll also need some kind of pump if your site doesn’t have any natural slope toward an existing drain or gutter system; otherwise the water won’t flow away from your work area easily enough during mixing and pouring operations.
Steps to build a concrete fountain basin:
Step 1: Prepare the site
Use a shovel to dig out the area where you want to place your fountain. If you have any questions about how deep or wide to make it, check with your local building department before proceeding.
Step 2: Determine the size of your basin
Measure the length and width of the area that will be covered by your concrete basin, then multiply these numbers together to determine how much concrete you’ll need. For example, if you want a circular basin 10 feet in diameter (which would require 20 square feet of concrete), you’d need about 400 pounds of ready-mix concrete mix.
Step 3: Mix up some concrete
Follow manufacturer instructions for making ready-mix concrete, then spread it into place using a shovel or trowel until it’s level with the surrounding ground surface. If you’re building a square or rectangular basin, use masonry blocks or wooden stakes to mark out where each corner will go so that there are no gaps between blocks when they’re set into place later on. Set them in place by pouring water over them; this will let excess cement seep out of joints between blocks while they set up overnight.
Concrete is one of the most versatile building materials on the planet. It is used in everything from sidewalks to skyscrapers, and it’s easy to work with as long as you know the basics. If you’re planning to make a concrete fountain basin, here are some tips for making it strong and sturdy.
Concrete Fountain Basin Basics
Concrete is made up of cement, sand and gravel. You can use any type of water-resistant concrete for your fountain basin; however, if you live in a wet area or have a particularly heavy fountain, you may want to use high-strength concrete instead of regular concrete mix. High-strength concrete is more expensive but also more durable than standard mix.
Before pouring your cement foundation, make sure that there’s enough room for it to dry properly. Concrete foundations need at least 24 hours before they can be walked on or used for their intended purpose. If your project will take longer than this, consider using a day-wet patching method that allows you to walk on the foundation after only 12 hours of curing time. The day-wet patching method involves pouring an inch or two of water into the bottom of your basin before adding the cement mixture, then covering it with plastic sheets until
When you’re building a fountain, you need to make sure that your basin is sturdy enough to hold the weight of the water. Concrete is a great material for fountains because it’s durable and easy to work with. This article will teach you how to make a concrete fountain basin.
The first thing you’ll need is an old milk crate or some other box that will hold your fountain pump and filter. You’ll also need some rebar, which is used to reinforce concrete. If possible, try to use rebar that’s already been cut for ease of use. You’ll also need some concrete mix, which comes in bags at home improvement stores. Finally, you’ll need a few other items:
A shovel
A sledgehammer or mallet
A level (optional)
Wood planks (optional)
Step 2 – Make a Foundation for Your Fountain Basin
First, make sure that you have something sturdy on which to build your concrete basin. If there’s no existing structure on which to build, then you can use wooden planks to create something sturdy but temporary while constructing your concrete foundation.[2]
Concrete is a popular choice for building patios and decks, but it’s also the perfect material to use when you’re building a fountain basin.
Concrete is easy to work with and is available in many different colors to match your home’s decor or your personal taste.
If you are planning on building a concrete fountain basin, you will want to make sure that you choose the right type of mortar and that you follow the proper steps when pouring the concrete.
The first step in constructing a concrete fountain basin is to lay out all of your supplies and equipment. You will need mortar mix, water, trowels, gloves and buckets.
Next, create a level surface where you want to build the fountain. You can do this by using stakes placed around the perimeter of the area where you wish to build your fountain or by using string lines and staking them down at each corner of the area as well as along all four sides. Once all stakes have been properly installed, start filling in holes with gravel until all holes have been filled then tamp down gravel so it is flat and level. Next spread topsoil over entire area then rake it smooth so there are no bumps or depressions remaining after spreading topsoil over entire area then rake it
The most important thing is to build a concrete fountain basin that will last. This means pouring the concrete into a mold.
The best way to make a concrete fountain basin is to pour the concrete into a mold. A good mold is made out of wood and has been cut out by hand. The wood is then secured in place so that it cannot move while you are pouring the concrete.
There are many different methods for making a concrete fountain basin, but they all have one thing in common: they use some sort of mold or form to shape the water feature. The simplest method involves simply shaping the ground around the area where you want your fountain to be located so that it looks like an actual pond with clear sides and bottom, but this can be time consuming and difficult if there isn’t enough dirt in the area where you want your pond located or if there’s too much rock or other natural materials like tree roots and vines growing in the way.
Another option is using preformed plastic or metal forms for making concrete fountains which are available at most home improvement stores and online retailers such as Amazon.com or eBay