How to build a gardening bed
As the weather warms up and we start to see some green signs of spring, I often get questions about easy ways to decorate your new or existing home with a touch of nature. Today I am going to share my simple diy project of how to build a gardening bed. These vertical gardening beds are great for those who have little yard space, but still want to enjoy natural beauty and the scent of flowers. These kinds of beds can be made in any size, color and material!
Recently I did a gardening blog post that got some good traction with the gardening community. The instructions were quite detailed and provided all the information you need to build your own cheap and easy garden bed. People who had already read my post loved it,how to build a raised garden bed with wood how to build a raised garden bed with concrete blocks but people new to gardening found it slightly overwhelming. There is a lot of great information in there, but it was just too much for complete beginners. So below is a step by step guide to building your own gardening bed. It’s aimed at people who have no experience in growing vegetables or have little experience of gardening. If you have any questions, please feel free to ask me in the comments!
How to build a gardening bed
Raised garden beds are a great way to grow vegetables, herbs and flowers. They’re easy to build and can be made from a variety of materials. Here are some tips for building raised garden beds with wood and with concrete blocks.
How to Build a Raised Garden Bed With Wood
Step 1: Lay Out the Garden Bed
If you’re building your garden bed in an existing area that has been tilled, rake out any remaining debris — including weeds — and level the soil. If there is no existing bed, till the soil in the chosen location and treat it with lime if needed. Then, lay out the garden on top of this prepared area. The width of your garden should be at least 3 feet wide and 10 feet long if you plan on growing vegetables or other plants that will require lots of space. If you’re planting flowers or herbs instead, then you can make a smaller bed — around 2 feet wide by 6 feet long is ideal for most gardens.
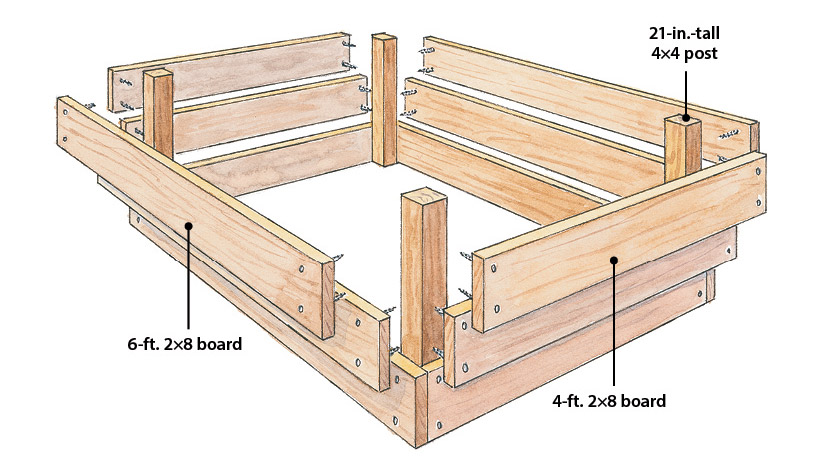
Step 2: Prepare Your Frame
You’ll need two pieces of wood for each side of your frame: one 2×4 piece for each end and two 2×2 pieces for each side (if using standard lumber). Cut these pieces down so that they are as tall as your desired
Raised garden beds are a great way to grow vegetables and herbs. They make it easy for you to control the soil that your plants are growing in, and they also keep your plants off of the ground, so they’re protected from pests like slugs.
Raised garden beds can be made from wood or concrete blocks. The most common raised garden bed is made from wood because it’s cheap and easy to find materials for it, but concrete blocks are better for people who want a more permanent bed that never needs to be replaced.
Wooden Raised Garden Beds
The easiest way to build a wooden raised bed is with 2 x 4s and plywood or OSB (oriented strand board). These materials are inexpensive, easy to work with and readily available at any home improvement store.
To build a raised bed out of 2 x 4s, you’ll need three pieces of lumber cut into 2-foot long pieces (two long sides) and two pieces cut into 3-foot long pieces (two short ends). Cut each piece at 45 degrees on one side so that there are four sides on each end of your boards instead of just two. This will make it easier for you to attach them together later on in the process.
Next, lay out
Raised garden beds can be made from wood, concrete blocks or even pallets. The easiest way to build a raised bed is with wood. But if you have time, energy and access to materials, building a raised bed out of concrete blocks or pallets is a much cheaper option.
Materials needed:
Wooden slats
Nails
Sandpaper (optional)
Stakes or bricks for corners
Step 1: Measure your wooden slats according to the dimensions of your bed. You can find these at any hardware store. Cut them down with a saw or miter box if they are too long. Sand them down if they need smoothing out from being cut with tools.
Step 2: Place one end of your first slat on the ground, then place another slat next to it at an angle so that it forms an L shape when viewed from above (see image). Nail these two pieces together by hammering nails through both slats at each end where they meet up together. Repeat this process until you have all four sides of your bed built up using this L-shaped frame method.
Wood is one of the most popular materials for building a raised garden bed. It’s easy to work with and readily available at home centers and lumberyards. And if you’re looking for inspiration, there’s no shortage of plans online.
Installing wood framing around your garden bed isn’t terribly difficult, but it does require some basic carpentry skills. You’ll want to make sure you have a level surface on which to build your frame and create a backing board that won’t rot or warp over time. To create this backing board, we recommend using either pressure-treated lumber or cedar boards that are at least 2 inches thick.
The first step in building this raised garden bed is to cut the top and bottom rails from pressure-treated lumber. These should be about 2 inches longer than the desired height of your garden bed — plus an additional inch on each end for overlap — so that there’s room for them to fit into the corner posts without overlapping too much. Then cut four corner posts from pressure-treated lumber as well; these should measure 12 inches shorter than the length of your rails plus 1 inch (for overlap). Finally, use a miter saw or circular saw to
Raised beds are a great way to get started in gardening. They can be built on any surface and are relatively easy to maintain.
Raised beds have several advantages over traditional gardening methods:
They can be built anywhere; you don’t have to worry about digging up the ground or disturbing your lawn.
They’re easier to weed, since you can reach all parts of them with a garden hoe or other tool.
They allow you to grow plants closer together than in an open garden bed, which can reduce the risk of disease.
They’re good for growing vegetables and flowers because they keep the plants off the ground, where they could be infected by pests or weeds (and also where they would compete with other plants).