How to build a wooden archway
An archway adds a touch of sophistication to your home’s exterior. They can give the appearance of luxury while highlighting an interesting architectural detail. This can work for both traditional homes and modern houses, which is what makes them so versatile. You can build an archway out of stone or brick, but building one from wood is much less expensive and easier to install.
How to build a wooden archway, how to make a curved wooden arch, wooden archway trellis, out of reclaimed timber and green cement (plaster) on the cheap. A step by step guide with pictures.
How to build a wooden archway
Wooden arches are a great way to add an archway to your home or garden. These structures can be used for many different things and have multiple uses. You can use them as arches, trellises or even gates in your garden. They are very easy to make and you only need some basic tools and materials. In this article, we will show you how to make a wooden archway step by step.
You will need:
A saw (hand saw or circular saw)
A drill
A screwdriver
Wooden boards (12 inches wide)
Nails (1 inch nails)
How to Build a Wooden Archway
You will need:
– A wooden archway kit.
– A circular saw, jig saw and drill.
– Safety equipment (goggles, gloves).
– Measuring tape.
– Wood glue and screws.
How to build a wooden archway
The way I see it, there are two ways to approach this project. You can either take a lot of time and make it perfect, or you can do it quickly and learn from the mistakes.
If your goal is to build something that will last for years and look good, then take your time. Otherwise, just make something that gets the job done.
Here are some tips:
1) Start with some basic tools
You don’t need expensive tools for this project. You’ll need a saw (a circular saw or jigsaw), some sandpaper, drill bits, screws and other fasteners, glue and paint if desired. A table saw or router will help with making the curved portions of the archway smoother (but isn’t required).
If you’re looking for a way to add elegance and style to your home, consider making an archway. Archways are quite versatile and can be used in many different areas of the home. You can use them as entryways or decorate them with plants. They also make wonderful additions to outdoor spaces and gardens.
To build a wooden archway, you’ll need the following materials:
wooden arches
wood glue
tape measure
drill
circular saw (if you plan on cutting the wood yourself)
jigsaw (if you plan on cutting the wood yourself)
Wooden arches are beautiful and can make a great focal point for your yard or garden. They’re also easy to build, with just a few tools.
The first step is to make sure that the wood is straight and level. If you don’t have access to a table saw, you can use a circular saw instead. It’s important to get the cuts as accurate as possible so you don’t end up with gaps between the boards when you fasten them together.
Once you’ve cut all of your pieces, it’s time to assemble them into an arch shape. Use clamps to hold the pieces together while you secure them with screws or nails (a drill will make this process easier).
Once everything is secured, fill in any gaps between the boards with wood putty or joint compound. You can then paint or stain your arch as desired!

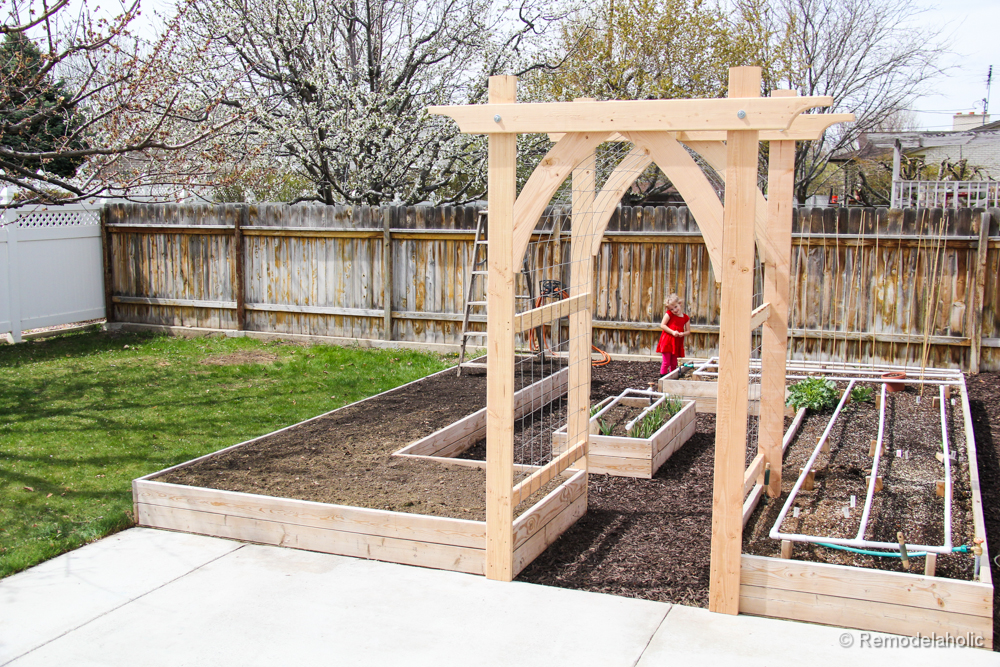
How to make a curved wooden arch
If you have a curved wooden archway trellis, you can use it to make your own arch for wedding.
The wood used for the arch is usually pine or spruce and it is recommended to use a softwood that is easy to work with. The wood should be treated with wood preservative or varnish before starting work.
The first step is to measure the circumference of your head and make sure that this is equal to the distance between two points on each side of the head. Make sure that you take into account any headgear you will be wearing (helmet, hat etc) during the ceremony or reception.
You can also use a piece of string or cord attached at one end so that there can be no doubt about how much material needs to be cut off. This will ensure that there are no gaps in between each piece of wood when it’s assembled together on top of each other.
Cutting curves takes some practice but if you follow these simple steps then they should come out perfect:
1 – Cut a long strip of wood (around 1″ thick) which has been marked out into equal lengths along its length so that each piece
How to Make a Curved Wooden Archway
A curved wooden archway is an excellent addition to any garden or yard. It can be used as a trellis for climbing plants or as a decorative archway for the entrance of your home. This project is easy to make with simple tools and supplies.
Step 1: Selecting the Wood
You’ll want to select hardwood for this project, such as oak or cedar wood. The wood should be at least 2 inches thick so that it will be strong enough to support the weight of the flowers and vines that will grow on top of it.
Step 2: Cutting the Wood
Using a circular saw or handsaw, cut two pieces of lumber that are each 6 feet long x 4 inches wide x 2 inches thick. These will form both sides of your archway so they need to be exactly the same size and shape. You can also use one piece if you have enough room in your yard or garden space, but having two separate pieces allows you to move them around easier when you’re getting ready to assemble them together into an archway.
/cdn.vox-cdn.com/uploads/chorus_asset/file/19496388/01_arched_yard_arbor.jpg)
How to Make a Curved Wooden Arch
A curved wooden arch is a beautiful way to frame a doorway or garden path. This type of trellis can be made using almost any types of wood, but you may want to consider using cedar if you live in a damp area. Cedar is naturally resistant to rot and decay, and it has a lovely scent as well. You can also use pressure-treated lumber if you want the arch to last for many years.
The first step in building your own curved wooden arch is choosing what type of wood you will use for the project. Cedar or pressure-treated lumber are both excellent choices because they are resistant to rot and decay, but other types of wood will work just as well if this isn’t an issue for you.
You can purchase pre-cut pieces of lumber from most home improvement stores if you don’t want to cut your own pieces at home. Otherwise, use a miter saw or other saw to cut the boards into half-inch thick strips that are 12 inches wide by 48 inches long (or whatever size works best for your needs).
Next, lay out the strips on top of each other so that they form an “X” shape with one end resting on top of another piece’s bottom
A curved arch is a decorative element that can be used in a variety of ways. You can use it as a focal point in your garden or as an entrance to your home. It can also add a touch of elegance to your front porch or patio. The most common type of curved wood arches are made from wood and either have no support or have support on one side.
If you want to make a curved wooden arch, there are different types you can use. They include:
Wooden arches with no support
These types of arches don’t have any supports on the sides. Instead, they depend on their own weight to stay up without falling down. To make them, you’ll need to use 1×8-inch lumber that’s at least 6 feet long and nail them together using galvanized nails. Each piece should be 24 inches long and be placed 12 inches apart from each other so that they form an arc shape when viewed from above.

Wooden arches with support on one side only
These types of arches usually have one side supported by something solid like a post, wall or fence post while the other side is free standing. To make these types of arches, start by cutting two pieces of dimensional lumber into 4-foot
You can make your own curved wooden arch with a few simple tools.
It is quite easy to make your own curved wooden archway by yourself. The most important thing is that you must follow the instructions carefully and use the right tools.
Step 1: Prepare materials
You’ll need the following materials to build this arch:
1/2″ x 4′ x 8′ pressure-treated lumber (4)
1-1/4″ deck screws (50+)
Stainable wood glue
Saw
Drill