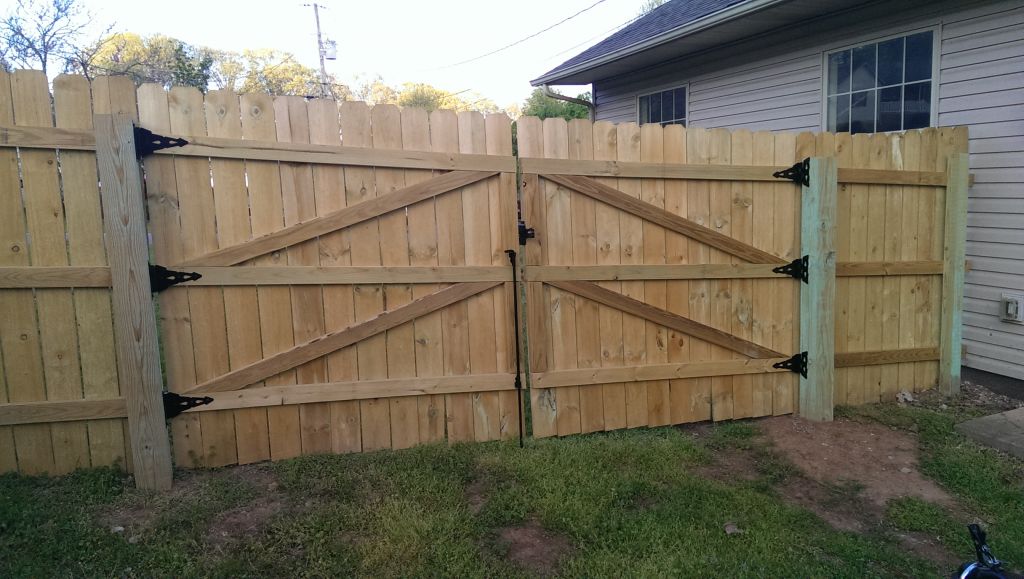
How to build a 6 foot privacy fence
Building a fence can be a tricky and even intimidating job, especially for beginners. For example, how should you start? And how do you know how long the fencing is going to be? Then there are the materials that you need to purchase, and the installation process itself. One of our builders will help you lay out your fence so that it’s easy to construct and enjoyable to look at.
Building a fence can be a difficult process. However, if you’ve never done it before, the process can get even more difficult, as you need to learn how to install shared fences and then build them. In this article, we’ll provide you with a guide that’ll walk you through everything you need to know when building your own fence.

How to build a 6 foot privacy fence
The most common type of privacy fence is a wooden fence. Wooden fences can be built using materials such as cedar, pine or treated lumber. When building this type of fence, it is important to consider what type of gate you would like to use and how high you want the fence to be. Once these things are decided, you will be able to begin building your privacy fence.
This article will show you how to build a 6 foot privacy fence with panels. You will learn how to install these panels on uneven ground and how to make sure that the panels are installed evenly so that they look great once they are finished.
How to Build a Wooden Fence Step by Step
Step 1: Measure Your Yard
Before starting any kind of project, it is important that you measure your yard so that you know what size of panel you need for your project. This will ensure that all of your panels fit together perfectly and that there are no spaces between them when they are installed. You will also want to measure the distance between each post so that all of your posts line up evenly as well as making sure there is enough space between each post and each side of
Building a 6 Foot Privacy Fence is a great way to add value and privacy to your yard. A 6 foot privacy fence will give you the perfect amount of space between you and your neighbors while still being able to see out of your yard. The most common material used for fencing is wood, but there are many other options available as well.
If you are looking for the best way to build a wooden fence, then this guide is for you! Learn everything from how much it costs to install an average sized wooden fence and what materials to use for the best results. We’ll also show you how to build a wooden privacy fence step by step so that you can do it yourself.
Building a wood fence is a great way to add privacy and security to your home. It’s also an easy DIY project that can save you money on the cost of hiring professionals.

If you want to build a wood fence, there are several important considerations:
Choose the right location for the fence. You’ll want to be sure that it’s not too close to trees or other structures that could damage it during high winds or storms.
Decide how tall you want your fence to be. Before making this decision, determine what kind of fencing will suit your needs best: privacy or security? Do you need something that blends into its surroundings or something more conspicuous? Taller fences make it easier for someone unfamiliar with them to spot them from far away, but they can also make it more difficult for neighbors who live behind them (or above) to see out of their windows without climbing up on a ladder! Your choice should depend on whether there are any homes behind yours or below you.
Determine how much privacy (or openness) you want by choosing between solid panels and lattices with openings between them. Solid panels will provide total privacy but may not fit well with all kinds of landscaping; lattices will let air
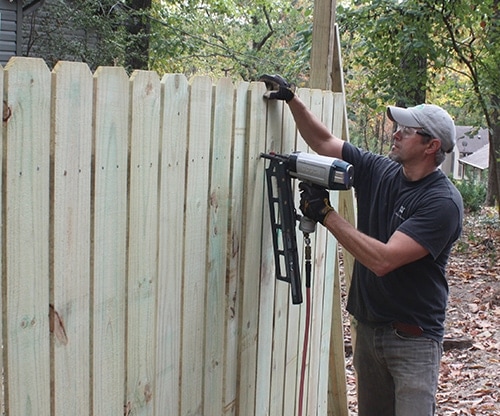
In this article, we will show you how to build a wooden fence step by step.
We will start with the materials needed for this project and then explain how to build the fence.
Materials needed:
Wooden posts, 1x4s and 4x4s
Wooden boards (1x6s and 2x6s)
Metal post caps
Nails or screws
Heavy duty saw, drill and power screwdriver
1. Measure the opening of your fence. Add 4 inches to that measurement for each post.
2. Dig holes for the posts. The depth of your holes should be at least as deep as the length of your posts plus 2 inches. The holes should be twice as wide as your posts, and 3 feet deep (or more). You will need to dig at least four holes, one for each post in your fence. If you are installing a horizontal fence with two posts per section, then you will need six holes total (two per section). If you are installing a vertical fence with three posts per section, then you will need nine holes total (three per section).
3. Place a post into each hole securely so that it stands upright without wobbling or leaning to one side or another too much. Make sure that the tops of all of your posts are even with one another so that they are straight when viewed from above and below ground level if possible because this will help to create a more consistent appearance throughout your entire fence line when completed.
4. Cut lengths of 2×6 lumber using a power saw or hand saw (as long as possible) so that each piece is slightly longer than the height between two adjacent posts that will be.
How to Install Wood Fence Panels on Uneven Ground
Wood fence panels are available in a variety of styles and colors. They can be used in a number of different ways, such as for privacy or decorative purposes. Installing a wood fence is not difficult if you follow the proper steps.
Step 1: Prepare the Area
Before you begin your project, you need to prepare your area. If there are any plants in the way, remove them first. This will allow you to lay out your materials and get started on building the fence without any problems. You may also want to clear away any rocks or debris that might get in the way of construction.
Step 2: Mark Out Your Fence Lines
Once the area has been cleared, use a chalk line or string to mark out where each panel will go along with its corresponding post hole locations.
Step 3: Dig Holes for Posts
When it comes time to dig holes, make sure they are deep enough so that they do not shift when filled with concrete later on in the process. Also make sure that each hole is wide enough so that it will accommodate both sides of each post as well as an appropriate amount of concrete for stability purposes
Installing a wood fence on an uneven ground can be tricky. Because the fence has to be level, you will need to build a level base for your fence posts. This will ensure that your fence is straight and even.
Step 1 – Digging the Holes for Your Fence Posts
You will need to dig holes for the posts with the right dimensions before you start building your wooden privacy fence. Ideally, each hole should be at least 6 inches deep and wide enough to accommodate both sides of the post comfortably. To do this, you can use a shovel or a post hole digger (a tool specially designed for digging holes). Make sure that there is enough room between each hole so that they don’t become too crowded together. You will also need to rent a jackhammer if your soil is very hard and compacted. If you are installing a wooden fence on uneven ground, then chances are that your soil will be very hard and compacted too! So make sure you get help from professionals if needed!
Step 2 – Placing Your Posts in Their Respective Holes
Once all holes have been dug out, it’s time to place your posts in them!
Wood fences are a great way to add privacy, security, and style to your home. They are also easy to install and maintain.
Here are some tips for building a wood fence on uneven ground:
Choose the right panels. Make sure that the panels you choose can be installed on an uneven surface. Otherwise, you will have to level the ground before installing them.
Make sure it’s level. Leveling the ground before installing your fence is essential if there are large gaps between each panel or if one side of your yard is steeper than the other side. You can use either soil or gravel between each panel as leveling material, depending on what works best for your situation.
Use spikes for stability. If you’re installing fencing along a steep slope, you’ll want to use spikes or stakes to keep each panel from shifting around too much when people walk by or stand on it while they’re working in the garden. You’ll also want to make sure that these bolts aren’t visible from inside your house or next door neighbor’s house because they will detract from the look of your yard’s landscape design features.
A wooden fence is a great addition to your property. It can help you create a private space and add curb appeal. But if you’re installing a wooden fence on uneven ground, it can be tricky to get the fence up straight and level.
Wooden fence installation requires some planning and care, but it’s not difficult once you know what you’re doing. The key is to make sure your posts are set in concrete at least 12 inches deep and to use pressure-treated lumber for the rest of the project.
You’ll also need some basic tools — including a circular saw, drill, post hole digger and measuring tape — along with wood screws or a hammer and nails for attaching the panels to the posts.
If your yard slopes downward from front to back or side to side, here’s how to install a wooden fence on uneven ground:
1Measure the distance between two opposing corners of your property line (the distance between points A & B in Figure 1). This will tell you how much slope exists between those corners (see Figure 2).
2Take an 8-foot long 2×4 piece of lumber and cut it into three equal lengths (24 inches each). These will serve as temporary braces for the posts until they are
1. Prepare the Foundation
If you are building a fence on a previously existing fence post, remove the old post and install it level with the ground. If you are installing new posts, dig down to firm soil, preferably below frost line. Use concrete or wood posts and set them in concrete or gravel at least 6 inches deep and 8 inches apart. Make sure that the posts are straight and plumb (not leaning). Use treated lumber for posts if you plan to stain or paint your fence at some point; use pressure-treated lumber for longer life if you don’t plan to stain or paint.
2. Install Cross Braces
Cross braces are not necessary for short fences, but they help stabilize longer fences and provide additional support for gates and other attachments. Use 4x4s or larger depending on how wide your boards will be; cut them to length as needed using a circular saw or table saw (you can also buy them precut at home centers). Set two braces up against each other so that they butt together end-to-end and are even on top, then nail them together with 10d nails; fill any gaps with caulking after nailing is complete. Nail one end of each brace into the post.