How to build a deck attached to a house
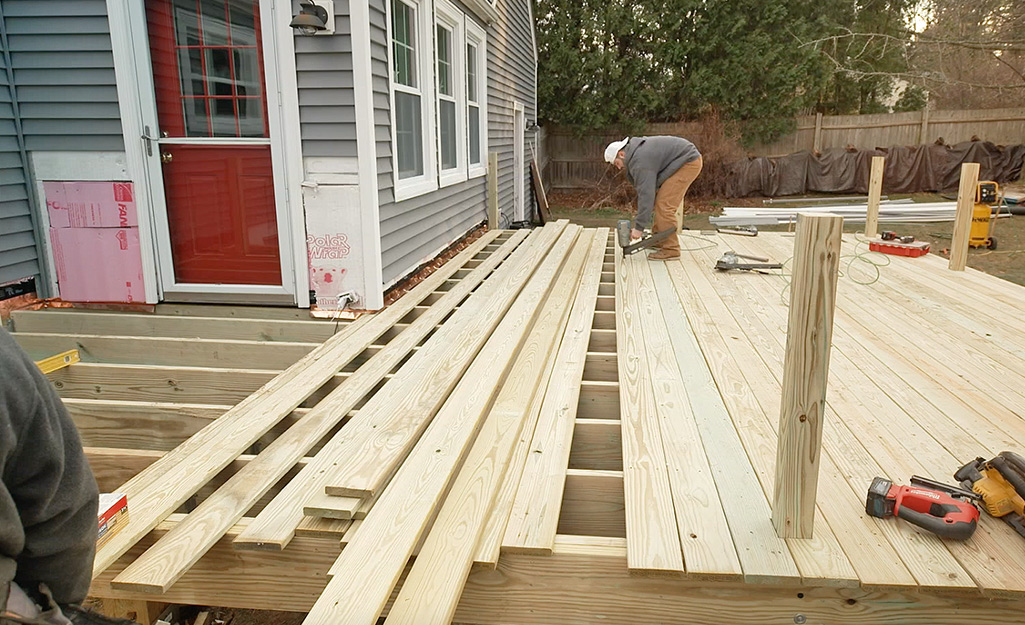
A flush deck attached to a home is not that complex. It is fairly simple when dealing with the framing part of the project, and there are some pretty simple cut lists you can use if you have ever built a deck before. However, when it comes to decking, you need to be sure that your deck goes in the correct order to make sure all of your materials will work. Find out how here:
For most people a deck built next to the house is their outdoor room, the place they spend most of their time in and therefore it requires very high quality. But such deck is also very expensive to build. There are various ways of saving: saving on costs and saving on effort!

How to build a deck attached to a house
This article will explain how to build a raised deck attached to a house. The steps listed below can be used as a guide when building any type of deck.
Step 1: Mark the location of your deck and determine the size of your deck.
Step 2: Dig the footings for your deck if you are building on concrete slabs, or lay out 4×4 posts if you are building on ground level.
Step 3: Lay out 2×6 joists on top of 2×4 beams for strength and stability. Then attach these joists together with 2x4s every 24 inches apart and nail them into place with 16d nails.
Step 4: Install your support beams by attaching them to the top of each joist with screws so that they are perpendicular to them. Make sure that each beam is level with its corresponding joist so it will sit evenly on top of it when it is installed.
Step 5: Use metal brackets or L-shaped brackets to connect each beam together at their corners so that they stand straight up and down from the ground or concrete slab instead of leaning over toward each other like they would without these connections being
A raised deck attached to a house can be an excellent way to expand your outdoor living space. When you create a raised deck, you can enjoy the view of your yard and the outdoors while still being able to use your kitchen, dining room and other areas of your house.
When building a raised deck attached to a house, it’s important that you follow all local building codes and ordinances. Failure to do so could result in fines or even having the structure torn down by authorities.
Step 1 – Plan Your Deck Design
In order to build a raised deck attached to your house, you’ll need to draw up plans for the project. This will help ensure that everything fits together properly when it comes time for construction. You should also contact your local building inspector prior to beginning construction so that he or she can inspect any plans you have drawn up and provide advice on how best to proceed with the project.
Step 2 – Excavate for Footings
Once you have drawn up plans for your deck design, begin digging footings using a backhoe or other equipment if necessary. The size of these footings will depend on what type of foundation material is used for supporting the deck
Raised decks are a great way to expand your living space and enjoy the outdoors from a higher vantage point. They’re also an excellent way to increase the value of your home.
If you’re thinking about building a raised deck attached to your house, we’ve got the tips and tricks you need to get started. Read on for everything you need to know!
Things You’ll Need:
A hammer
A tape measurer
Wood screws (1-1/2″)
A raised deck is a great way to add value to your home. It adds an outdoor living space, which can be used for entertaining guests or just relaxing with family. A raised deck can also be used as an outdoor room for cooking, eating and playing games.
A raised deck is built on top of the ground, but it does not touch the ground. This provides an additional level of protection from insects and animals that may damage your deck. Raised decks are also more comfortable than flat decks because they provide more space between you and the ground.
Building a raised deck attached to your house offers several advantages over building a free standing deck:
You will not need to dig up your yard to install the posts that support the deck platform.
Building a detached deck requires less maintenance than a connected deck because it does not get wet during the winter months when snow melts off roofs and rains down into the yard below.
The easiest way to attach a deck to a house is to use pressure-treated wood. But there are times when it’s not possible or not advisable. In this case, you’ll need to use non-wood fasteners. The most common method for attaching a deck to a house is by using lag screws driven into the side of the home’s foundation. If you have an older home with brick or stone siding, you may need to drill through the siding before installing these screws.
1 Attach a 2×4 ledger board directly above where your deck will be built, using lag screws and washers. This will serve as a support for your joists and help transfer weight from the deck down into the ground. You’ll also need to build this ledger board so that it extends out over the edge of your house’s foundation far enough so that it won’t interfere with any doors or windows in the future as they open and close.
2 Lay down plywood sheets on top of your ledger board, then add more joists on top of them (use 16-inch on center spacing). Nail these joists down every 12 inches through their 4×4 sides with galvanized nails (or use pressure-treated wood).
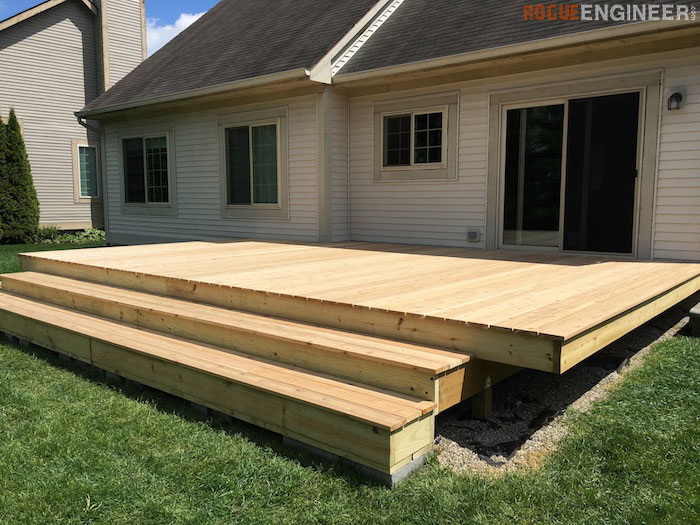
How to Build a Raised Deck Attached to a House
How to Build a Raised Deck Attached to a House. This article will show you how to build a raised deck attached to your house. You can use these instructions for decks that are freestanding or those built against the side of your house.
Steps:
1. Measure the height from ground level up to the top of your house. You will need this measurement when it comes time for construction.
2. Measure the width of your deck and add 3 inches per side for framing thickness (4 inches total). This will give you the size of lumber needed for framing out your deck’s structure.
3. Mark off where you want your joists placed on the ledger board at each end, as well as in between if necessary (for larger spans). Use chalk lines to mark off each joist location on the ledger board, then use those lines as guides when cutting pieces of pressure-treated 2 x 8 lumber with a circular saw fitted with a straightedge guide attachment or miter box and saw guide attachment on table saw. Each joist requires two cuts: one cut along top edge producing two pieces equal in length but unequal in width; second cut along
A deck can be a great addition to your home, but it can also be a major project. Whether you’re building a new deck or adding one to an existing structure, you’ll want to do some research and planning beforehand. Watch this video to see how to build a raised deck attached to a house.
The first step is to find the right location. The ideal site for a deck is close enough to the house so that you can enjoy it during those warm summer nights, but not so close that it feels like an extension of the house. If you have enough space, consider placing your deck off-center from your home’s main entrance. This will help make it feel more independent and less like an extension of your living space.
Next up is sizing up the project and deciding on materials. The most common type of decking material is pressure-treated wood, which comes in three basic types: cedar, pine or redwood (the latter two are slightly more expensive). You should also consider whether or not you want composite boards that include fiberglass strands; these tend last longer than wood alone and are easier on your wallet since they require fewer treatments for rot prevention
If you’re building a deck onto your house, there are some important considerations to take into account. First, you’ll need to decide whether the deck will be attached or freestanding. This can be decided by the type of house you have and how much space you have available outside it.

Another consideration is whether or not you want to make the deck flush with the ground or elevate it above grade. If your home has a basement, there will be much less exposure to moisture and insects when building a raised deck. If you plan on using your deck year-round, then this might be a good option for you as well.
If you are planning on constructing an attached deck, it should be built with pressure-treated lumber that has been treated with CCA (chromated copper arsenate). This is important because it prevents against rot damage from water penetration in outdoor environments as well as pests such as termites that can damage wood if left untreated for too long.
Building a deck can be a great way to increase your home’s value and make it more enjoyable to live in. You can build them on existing structures, such as your house or garage, or add them to new ones you’re building.
Before you start, make sure you know where you want the deck to go, how big it should be and what materials will be best for it. You’ll also need to consider things like soil conditions and whether your deck should be attached or freestanding.
If you’re building a raised deck, here are some tips for creating a solid foundation:
Choose the right type of wood for your project. Pressure-treated lumber is often used for decks because it resists rot and insects better than other types of wood. However, if pressure-treated lumber isn’t available in your area (or if you’re concerned about chemicals leaching into the soil), choose cedar or redwood instead. Both can last 50 years or more if properly cared for and maintained. Cedar is especially good at resisting insects like termites and carpenter ants because its natural oils repel them; however, it may require more frequent staining than other types of wood over time because its color fades when exposed to sunlight
Building a deck can be challenging, but if you follow the steps in this guide and use good construction practices, you can build a durable, safe and attractive deck.
Deck construction begins with a structure that will support the weight of people and materials. A simple way to do this is to erect a post every 4 feet (1.2 m) or so, set it into the ground about 12 inches (30 cm), then attach beams to each post. The beams form the deck’s perimeter and provide joists for attaching the decking material.
When building an attached deck, keep in mind how much weight your house can handle. If your home was built after 1990, check with your builder or local building inspector to determine what size posts are needed to support the added load of a new deck. You’ll also need to make sure that any expansion joints between your home’s foundation and basement wall aren’t blocked off by the addition of concrete footings under your new decking planks.