How to build a roof on a shed
We’re going to assume you have no idea how to build a roof on a shed. We’re also going to assume that you are saying, “I built my own shed, why do I need someone to tell me how to build a flat or pitched roof on a shed?”. Before we answer these two questions and provide you with the best way of building a roof on your shed, we are going to assume one thing. You somehow don’t know how to build a roof on a shed.
How to build a flat roof on a shedStart off by purchasing the wood you’ll need to construct your shed. This will typically depend on the size of your shed, but the general recommendation is 10-12 pieces of lumber, depending on how many walls you’ll have. A sheet of plywood will also be required, which will be used as your roof. If you’re building a rectangular shed, two sheets of plywood should be fine. But if they are in any way irregular, you should probably use 3 sheets.

How to build a roof on a shed
The project of building a new roof on a shed is not so complicated. You need to have some good tools and materials, but the process itself is quite easy.
First thing you need to do is to take off the old roofing material. It can be shingles or any other material that is currently used on your shed.
After removing the old roofing material, you will start installing new plywood sheets over the rafters. The sheets should be installed in such a way that they overlap each other by about one inch or more. This will help you seal the joints between them and prevent water from leaking inside your shed.
At this stage, we recommend using screws instead of nails for better results and durability of your newly installed flat roof or pitched roof on your shed
The roof of a shed is an important part of the building. It protects the structure from weather, animals and other elements. The roof can also be designed to make the shed look better, so it doesn’t just have to be functional.
The most common types of roofs for sheds are flat and pitched. A flat roof is a simple structure with no slope or angle that covers the entire top of the shed. A pitched roof is sloped at an angle, often at least one foot per 12 inches (30 cm) of height, or greater. Both types are simple to build, but they require different techniques.
Flat Roofs
Flat roofs are easy to build because they don’t require any angles or complex cuts. They’re also relatively inexpensive because they don’t require any materials other than wood boards or plywood sheets. If you want a flat roof on your shed, here are some tips:
1) Cut plywood sheets into squares large enough to cover your entire shed if possible; otherwise cut them into rectangles with sides long enough to cover your shed’s walls and top piece). Use a circular saw or jigsaw to cut them down if necessary: Don’t forget about doorways and windows on this step!
How to Build a Flat Roof on a Shed
A flat roof is the easiest type of roof to build. It’s also the simplest and one of the most cost-effective. The only tools you’ll need are some basic carpentry tools and a few sheets of plywood.
Step 1: Lay Out Your Sheets of Plywood
Lay out your sheets of plywood in a pattern that will cover your shed’s footprint. If you want to use the same pattern as with the walls, make sure you overlap them in the same way so there aren’t any gaps between sheets.
Step 2: Securely Attach Your Plywood Sheets With Screws
Securely attach your plywood sheets together by screwing them into place with 1-inch deck screws or 3-inch galvanized nails. Make sure you have plenty of screws available so that none of your sheets get loose or blow away in strong winds.

The easiest way to build a shed is with a flat roof. You can build a flat roof by attaching 2x4s to the top of your shed’s frame, then covering them with plywood or OSB (oriented strandboard). To make sure you get the right materials, check the thickness of the sheathing and figure out what size lumber you will need to cut.
Here are step-by-step instructions for building a flat roof on your shed:
1.Measure out the width of your plywood or OSB sheets, and cut them down to size with a circular saw or table saw (if you have one).
2.Lay out the plywood or OSB sheets over your frame, making sure that all edges line up perfectly before nailing them down with 1-1/4″ exterior screws. If you don’t have clamps available, use scrap wood blocks and shims as spacers so everything lines up properly when you nail it together.
3.When you’ve got all four sheets nailed down, trim off any excess material around the edges with a utility knife and hammer if necessary; this will ensure that water doesn’t get trapped between boards when it rains
The design of your roof is going to depend on the size of the shed, how much storage space you need and whether or not you have any plans for additions. The easiest way to build a roof is to start with a flat surface and then build on from there. If you’re looking for something more challenging, try pitching the roof.
There are two types of pitch: shallow and steep. A shallow pitch is one that has a slope of 1:12 — this means that for every foot horizontally, it rises one foot vertically (or 12 inches). A steep pitch has a slope of 1:6; this means that for every foot horizontally, it rises six inches vertically (or 18 inches).
A flat roof is easy to construct because there is no pitch involved; however, this type of roof does not hold up well in wet weather conditions. If you live in an area that gets lots of rain or snowfall, then you should consider building a pitched roof instead.
how to build a pitch roof on a shed
One of the most common problems that people have with their sheds is that they want to add a flat or pitched roof. The problem is that many people are not sure how to do this, and it can be difficult for the average person to find someone who can do it for them.
There are several reasons why you might want to add a flat or pitched roof to your shed. The main reason is because it will make it more attractive and will also improve its durability, especially if it is made from wood. If you have any kind of leaks in your shed, then this can be very dangerous, especially if there are electrical appliances inside the shed.
The first thing that you need to decide is whether you want to have a flat or pitched roof. A flat roof is much easier to install, but it does not look as good as one with a pitch or angle to it. Pitch refers to the angle at which the roof slopes away from its highest point on its slope. This can range anywhere from 45 degrees downwards all the way up until 90 degrees where it becomes vertical again and meets with the ground level.
A flat roof is the simplest and easiest type of roof to install. It’s also the most common type of roof on buildings, so this tutorial is appropriate for any home, shed or garage. If you want to learn how to build a pitched roof (also called a gable roof), see How to Build a Gable Roof.
A flat roof hangs from the rafters of your garage or shed and doesn’t have any slope to it at all. This means that there are no valleys in the surface, just horizontal planes. A flat roof is easy to install, but it does require some basic skills with carpentry tools and materials.
Materials Needed:
Sheet metal flashing (also known as EPDM)
Flat wood battens (usually 1×2 or 1×3)
Roofing nails or screws with washers (usually 3/8″ galvanized deck screws with washers)
A flat roof is the easiest type of roof to build. It requires no special tools, and you can build it using only basic carpentry skills.
A flat roof is made up of a series of overlapping sheets of plywood or OSB (oriented strand board), which are nailed to the rafters with galvanized nails. The plywood should be at least 3/8-inch thick, but 1/2-inch is even better.
The other option for your shed’s roof is a pitched roof. This type of roof has a slope that allows water to run off easily. A pitched roof can be made from different types of materials, including plywood and asphalt shingles. Here’s how to build a pitched roof:
How to Build a Shed Roof. Plan the structure of your shed by using the plans or sketching out the floor plan on paper.
Once you have drawn your design, you will need to cut out the pieces of lumber for each wall. Use a circular saw to cut out the boards. Once all of your pieces are cut out, use nails and a hammer to put together your walls. The first two boards will be placed on a flat surface so that they fit together properly. The other boards should be placed at an angle so that they meet at the top corner of the side wall and form an angle with the ground (pitch). Ensure that all boards are nailed tightly together so that they do not come apart while you work on them later.
Once the walls are up, place a sheet of plywood over each wall section, aligning it with the top edge of each side wall and securing it in place with nails or screws that are long enough to penetrate through both pieces of wood (the door frame will go over this later). Make sure that there is enough clearance between each piece when installing so that you can get inside easily once it is finished!
After installing all four sides with plywood sheets, install another layer of plywood over the entire roof structure
The most common types of roofs are flat and pitched. A flat roof is one that is level with or slightly above the ground. Flat roofs are usually used on sheds, garages or utility buildings. A pitched roof has a sloped surface, which allows it to shed water and snow easily when it rains. Pitched roofs offer more protection against rain than flat ones do, but they require more maintenance because they collect leaves, snow, and other debris more easily than flat roofs do.
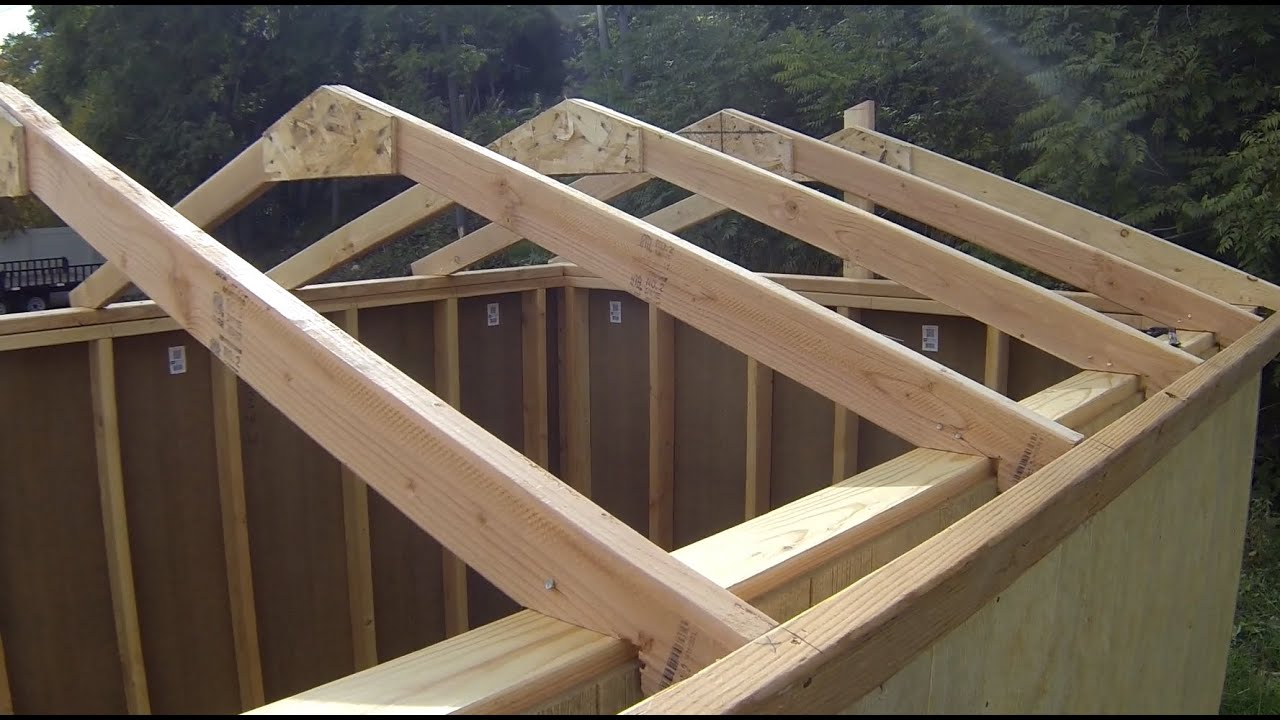
Pitched Roofs
A pitched roof is normally constructed with rafters and trusses for support. The rafters are attached to the top plate of the wall at intervals along their length by nailers, which serve as bracing for the rafters against wind uplift forces. The sheathing on a pitched roof is installed over all surfaces below the ridge line of the roof (except for skylights) to prevent water from seeping in through gaps between components such as flashing and siding materials. The bottom edge of sheathing should be at least 1″ above grade so that water will not be able to flow under it and cause rot in underlying framing members or insulation materials.