How to build a slanted shed roof
If you’re looking for how to build a slanted shed roof, this is the right guide for you. It explains everything about slanted shed roofs and how to build one.
This article will walk you through the steps and a free simple program that gives you the math and cuts all the pieces you need to build your own slanted roof shed or pergola in your back yard.

How to build a slanted shed roof
How to build a slanted roof shed. In this video I show how to build a slanted roof shed. The reason I built this shed was because I needed a place to store all my tools and materials for my other projects. The tools are just laying around the garage and I needed them all in one place!
Sheds are great because they can hold so much stuff and it’s easy to put up! You only need two walls and some rafters, then you’re done! If you have the right tools and materials, then building a slanted roof shed is easy! Here are the steps to building your own:
1) Get your materials together. You will need some 2x4s, 2x6s and plywood sheeting. You can use whatever kind of wood you prefer but make sure it’s treated or painted so it lasts longer against the weather elements
2) Lay down your first set of rafters on top of each other with their ends facing outwards (meaning they point away from each other)
3) Lay down another set of rafters directly on top of each other again with their ends facing outwards from each other
4) Measure how long each rafter should be by using two
Slanted Roof Shed Plans
The slanted roof shed is one of the most popular roofs for sheds. This design has been used for hundreds of years, and it is still a very popular choice today. The slanted roof shed can be a great addition to your property because it gives you extra room inside the building and makes it easier to use your tools or store items.
The slanted roof design has two main advantages over other types of roofs:
It allows more space inside the shed or storage area, which is important if you need to store larger items like lawnmowers or bicycles.
The slanted roof lets you store items closer to the ground than other designs would allow, which makes it easier to reach things inside the building without having to crawl on your hands and knees or get down on your knees first in order to reach them.
To build a slanted roof, you need to be able to cut angles on your miter saw. You can do this with a compound miter saw and a special fence that allows you to angle the blade up and down, but you can also accomplish the same thing using just a standard miter saw and some extra tools.
A compound miter saw has two different angles on the blade, so it can make both angled cuts and beveled cuts. To make an angled cut in one direction with a compound miter saw, place it against something solid and align it so that the teeth of its blade are facing away from you. Position the material against the back rail of your compound miter saw so that it overhangs by at least 1 inch (2.5 cm). The amount overhang will vary depending on how much slope you need for your roof; if you’re building an A-frame shed roof, for example, then you may need as much as 6 inches (15 cm) of overhang to achieve enough slope.
Make sure that all four legs of your structure are sitting level on flat ground before positioning them incorrectly with shims under one or more legs until they are level. Use
This small shed was built to be a storage space for firewood and gardening supplies. It’s not particularly large, but it is solid and functional.
The roof is slanted so it can shed water better than a flat roof would. The steep pitch of the roof also adds interest to an otherwise plain structure.
When building a slanted roof, the trick is getting the angles right so that the two sides meet properly at the peak. Here are two methods for creating a slanted shed roof:
1) Use a rafter square and mark the angles on each rafter.
2) Use an angle finder to set your miter saw at the correct angle and then use this setting as a guide when cutting each rafter to length
This is a very simple way to build a slanted roof.
You need a wood frame and for this project we used plywood for the frame. The size of the frame depends on how much space you want to use as storage.
The next thing to do is put up the rafters and attach them to the top of the walls. Make sure that you have enough support at the bottom so that they don’t fall over when you put weight on them.
Make sure that everything is level and square before attaching it permanently with screws or nails.
Here is an easy to follow, step by step tutorial on how to build a slanted roof pergola. This is for the DIYer that wants to save a lot of money and have fun doing it! A slanted roof shed is great for storage and can be used as a sun room or even a place to relax on a hot day. See more at www.woodworkingplansi.com
How to Build a Slanted Roof Shed
A slanted roof shed is the perfect way to add an attractive and functional storage space to your backyard. The slant creates an overhang that provides shade and shelter from rain, while allowing air to circulate freely through the shed. Building a slanted roof shed is not difficult if you have the right tools and materials on hand.
Step 1: Lay Out Your Plans
Before you begin building your new shed, take measurements of the area where you want to place it. Make sure there is enough room for it, as well as a path leading from the house or garage door to it. Some people like their sheds placed near trees or other obstacles for extra privacy.
Step 2: Prepare the Foundation
Dig two holes for your shed posts in a straight line at least 10 feet apart from each other. Make sure that the posts will be level with each other when placed in the ground, or else they will not support your shed correctly once built. Pour cement into each hole and allow it to dry completely before installing your post caps onto them.
A slanted roof shed is a great way to maximize your storage space. You can build it for less than $500 and the materials are easy to find at any home improvement store.
In this tutorial, we’re going to show you how to build a slanted roof shed with just two posts in the center of the structure. This type of shed is perfect for storing lawn equipment and other items that you don’t need access to on a daily basis. The best part about this project is that it only takes a few hours from start to finish!
A slanted roof pergola is a great way to add shade to your backyard. It can be used as an outdoor living space, or simply as a place to sit and relax. This project should take approximately two days to complete, depending on how big you want the pergola to be and how much help you have from friends and family.
Before you start building, make sure that you have all of the necessary tools for this project. You will need a saw, hammer, nails and screws, as well as some basic carpentry skills. You will also need some lumber for framing up the base of the pergola and attaching it to your home or shed.
Step 1 – Measurements
You will need to measure your yard carefully in order to determine how large your new pergola should be. You’ll want it large enough so that there are ample places for guests to sit down, but not so big that it takes up too much room in your yard. Make sure that there is enough room around all sides of the structure so that people can walk through without bumping into each other or having their feet stepped on by others sitting down below them on benches or chairs at ground level.
Step 2 – Build Base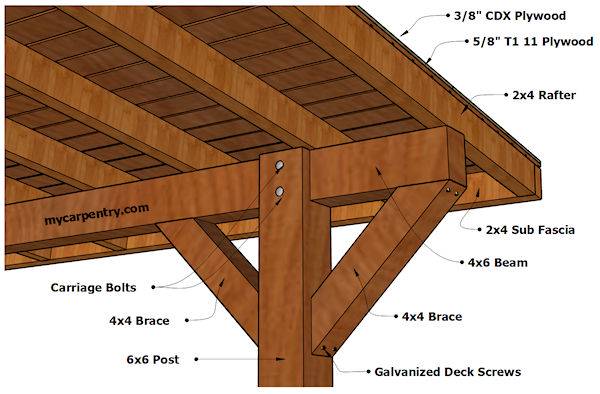
The easiest way to build a slanted roof is to have the lumberyard make it for you.
If you’re going to use standard lumber, here’s how you do it:
1. Cut each rafter so that its bottom edge is 3 inches longer than the distance between your posts and its top edge is 1 inch above the peak of the roof (the highest point).
2. Lay out a level line from one post to another, then measure down from the peak of your roof in 2-foot increments along this line. You should now have 12 marks on your line where rafters will fit.
3. At each mark, measure down from the peak of your roof by 1 inch and draw a line across all four sides of each rafter at this point. This gives you a place to start nailing when installing each rafter.
4. Cut each rafter at its top edge so that it fits between two posts on either side of your shed, leaving about 1 inch between them at this point. The rafters should also be long enough so that they overhang the front and back edges of your shed by about 2 inches on both sides — this will give more support for snow loads than if they were flush with these edges