How to build a storage bench seat
How to build an outdoor storage bench. Today, homebuilders are increasingly looking for ways to make a house more efficient by designing it with fewer, more multi-functional rooms. A trend that’s gaining popularity is building a tidy little addition on the side of the house to store all sorts of throw-away items, including bulky items like that old grill you never use, anymore.
Building a storage bench seat is an easy project that could solve storage issues in your home. Learn how to build a wood storage bench seat for your patio or outdoor living area with this guide and advice from our expert. She designed her own outdoor storage bench, then removed the back cushions and replaced them with shallow drawer units, then replaced the lid. The lid incorporated two handles and had an angled cut on each end, so when the lid was flipped up, you could reach into the drawers.

How to build a storage bench seat
A storage bench seat is a great way to add extra seating and storage to your outdoor living space.
The best part about building your own outdoor bench is that you can customize it to fit your specific needs. You can choose the size and style of the bench, as well as how much storage space you want.
In this tutorial, I’ll show you how to build an outdoor storage bench with a lid by using cedar fence pickets. The project will cost approximately $100 in materials (not including tools).
There are several ways to make a storage bench seat. You can buy a kit or build your own, using wood or plastic. Build the frame for the bench first, then attach the seat and lid to the frame. A lid adds extra storage space but it also adds weight to the unit. If you’re planning to sit on your storage bench, you might want to consider making it without a lid. You’ll still have plenty of storage space for items like blankets and pillows.
Build Your Frame: The frame is what holds your storage bench together, so it’s important that it’s well-made and sturdy. Use 3/4-inch plywood or hardboard for the top and bottom pieces and 1x2s for all other parts unless otherwise specified in your plans. Make sure all joints are snugly fitted together so they don’t loosen over time. Attach each end piece with screws through pilot holes drilled through the face of each side member at 45 degrees (to prevent splitting). Use screws rather than nails wherever possible because they won’t pull through over time like nails tend to do when pressure is applied against them as in this case where someone will be sitting on them!
How to Build a Storage Bench
A storage bench is a great way to add extra seating and storage space to your deck, patio or porch. It’s also a great way to hide your outdoor cushions from the elements. If you’re looking for an inexpensive project that will give your outdoor living area a nice touch, then a storage bench may be just what you need.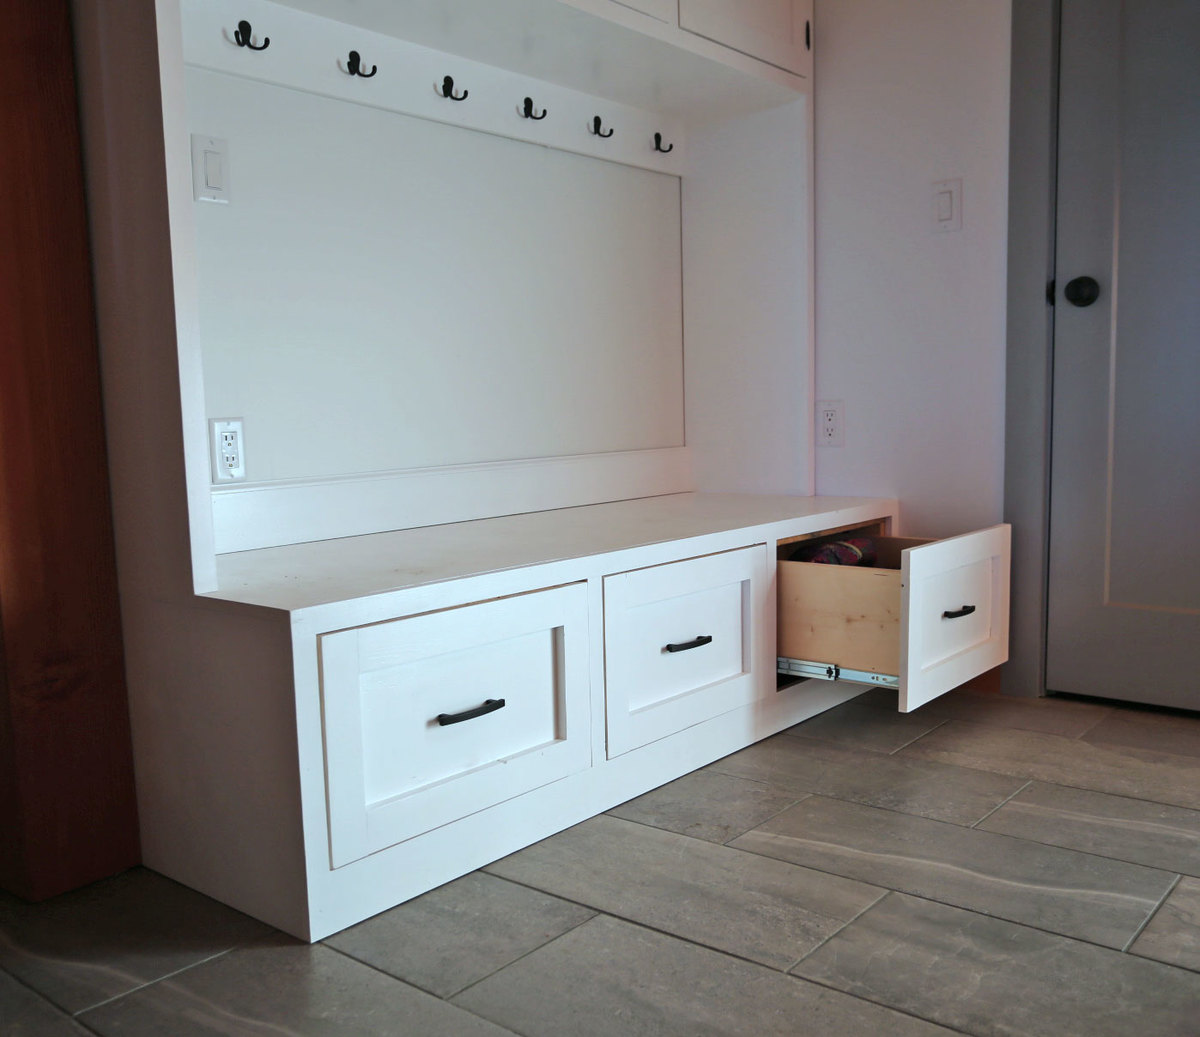
You’ll need some basic carpentry skills and tools for this project. You will also need about 3/4 inch plywood for the seat, legs and lid support. You can purchase this at any home improvement or hardware store in the lumber section.
Step 1 – Make the Seat
Cut 2 pieces of plywood into squares that are 12 inches wide by 16 inches long. Lay them on top of each other with the edges lining up flush with one another and screw them together with 2 inch screws through pilot holes drilled into each side piece before joining them together with glue. Screws should be placed every 8 inches along all edges except where they meet in the middle where they should be placed every 4 inches instead. This will make sure that it is strong enough to hold up against weight without breaking apart under pressure while sitting on it or leaning against it while sitting inside of it so that no one gets
A storage bench is a great addition to your home, especially if you have limited storage space. A storage bench seat is useful for storing items, but can also be used as extra seating in small spaces like a mudroom. The best part about making one yourself is that it’s cheap and easy to do.
Here are some tips on how to build an outdoor storage bench:
Step 1: Choose the Right Material for Your Storage Bench
When choosing what material you want to use for your storage bench seat, consider the longevity of the material and whether it will stand up against the elements. Some materials that work well include:
Pressure-treated lumber — If you’re building an outdoor storage bench, pressure treated lumber will last longer than other types of wood because it has been treated with chemicals designed to prevent rot and decay from water damage. However, this type of wood can be difficult to work with because it tends to split easily during construction. Make sure you purchase pre-cut pieces so you don’t waste any time cutting them down yourself.
Wood composite — Wood composite is made from recycled plastic that’s mixed with sawdust or other organic material; this gives it an aesthetic similar to real wood without sacrificing durability or strength.
Step 1: The Bench Seat
The bench seat is the most important part of the storage bench. It’s where you will sit and rest your legs, so it needs to be comfortable. You can make the bench seat as long or short as you want, but if you plan on sitting down while working, a longer bench seat will be more comfortable than a shorter one.
The first step to building your own storage bench is building the actual seat portion of your project. This can be done using 2x4s or 2x6s, depending on how thick you want it to be. Use glue and screws to hold everything together and make sure all of your edges are flush with each other so nothing catches when you move around in your new piece of furniture!
Outdoor storage benches are a great way to add a functional, decorative element to your yard or garden. You can use these benches for just about anything from storing gardening tools and supplies, to extra seating for guests.
The best part is that they are very easy to make from inexpensive materials. Here’s how you can build an outdoor storage bench with lid:
Materials
2x4s cut at 7 1/2 inches long (4)
1x4s cut at 7 1/2 inches long (4)
Wood screws (5 1/2 inch) (8)
L-brackets (4)
Paintbrush
This DIY outdoor bench project is easy and inexpensive. It’s a great way to add seating and storage to your backyard.
How To Build An Outdoor Storage Bench
An outdoor storage bench is a great addition to any deck or patio. It provides extra seating and a place to store items out of sight. We built this one with a lid, but you could also leave it open and just make sure the hinges are on the inside so they don’t get in the way when you open the lid. The project is simple enough that you can probably do most of it yourself, but if there are any parts that you’re not comfortable with, hire someone like this handyman to help out!
Materials:
2 3/4″ pocket screws (2)
2 1/2″ screws (1)
how to build an outdoor storage bench
A bench that gives you extra storage space is a great addition to any patio or garden. The design can be as simple or elaborate as you like, but I prefer to keep things simple.
The biggest issue with building a storage bench is finding the right materials. You need something that will withstand the elements, and most importantly, it needs to be strong enough to support the weight of your stuff.
The easiest way to build a storage bench is with cedar lumber. Cedar is easy to work with, resists rot and insects, and looks great. It also comes in 4×8 sheets which makes it easy for someone with limited woodworking skills like me.
I made my bench from 2x4s and 2x6s because they’re easier to work with than dimensional lumber like 2x4s or 2x6s. If you have access to dimensional lumber then by all means use it — just make sure you get one that’s treated for outdoor use so it won’t rot over time.
A storage bench is a great addition to any yard, garden or patio. They are practical and can be used as extra seating, as well as serving as a place to store things. The designs for these benches are endless. You can create them from wood or stone and paint them any color you want.
A traditional wood storage bench is made with 2×4s and 2×6s. The top of the bench is made from one sheet of 3/4″ plywood that is cut into two pieces and attached together with glue and nails. The legs are made from 4×4 posts that are cut to size and then attached to the base with screws through predrilled holes.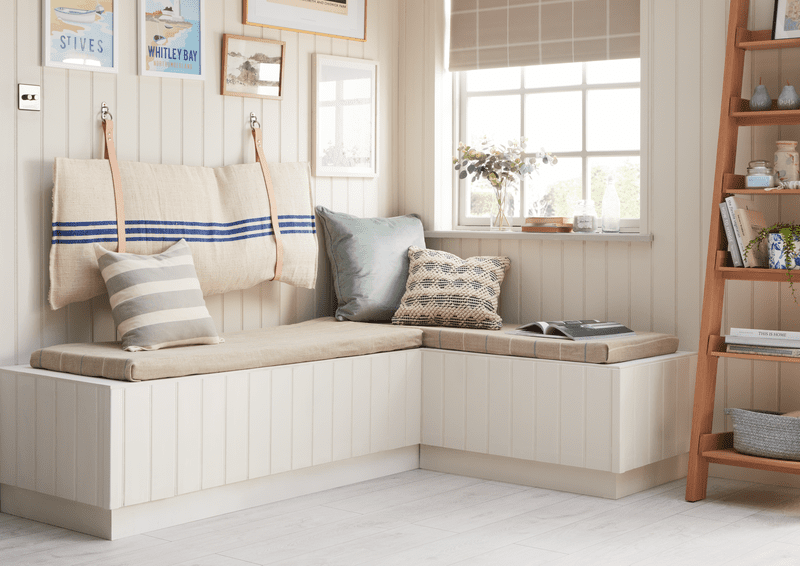
The best way to make sure your storage bench is built correctly is by using a jig saw or miter saw when cutting all of your pieces to size so they fit together perfectly without any gaps or overlaps. If you don’t have access to either of these tools, you can use a handsaw instead but it will take much longer to complete the project because more time will need to be spent sanding your joints down until they fit together well enough without any gaps or overlaps that can cause splinters when sitting on them later on down the road!
Once all
The plans for this outdoor bench include a lid on top, which will make it perfect for storing toys and other yard items. The bench can also be used as a seat or side table, depending on its size.
The project is not very difficult, but it does require some basic woodworking skills. If you have never built anything before, this is a great project to start with.
Tools Required:
Saw (circular saw or jig saw)
Drill/driver
Clamps (for attaching the lid)