How to build a wall mounted desk
A wall mounted desk is a very versatile kind of desk design. Your work area can be expanded or reduced depending on your needs. When building your own wall mounted desk, you have the opportunity to make it fit the way you want it to be and at the same time save a lot of space.
Did you just purchase a new house, and are you planning to build a new desk, how to build a wall mounted corner desk, how to build a wall mounted fold down desk? Well, I have some news for you: there are a lot of mistakes you could make.

How to build a wall mounted desk
A wall mounted desk is a great way to save space, especially in small apartments and dorm rooms. Here’s how to build a wall mounted corner desk, fold down desk or even a computer workstation using a wall mounted desk kit.
1. Choose the Right Wall Mounted Desk Kit
The first step is choosing the right wall mounted desk kit for your needs. There are lots of different options available and some of them may be more appropriate than others depending on your particular situation. For example, if you’re looking for something that folds up against the wall when not in use, then you’ll need something like this that has moving parts so it can be stored away when not in use. If you’re just looking for something simple that’s easy to install and doesn’t take up too much space then there are lots of options like this one that can be mounted directly over an existing desk or table without taking up too much additional room on its own.
How to build a wall mounted desk
A wall mounted desk is a great option for a small home office, or for someone who wants a space saving solution. The downside is that you don’t have as much room for your computer and other equipment, but if you’re looking for something simple and minimalistic, this is definitely the way to go.
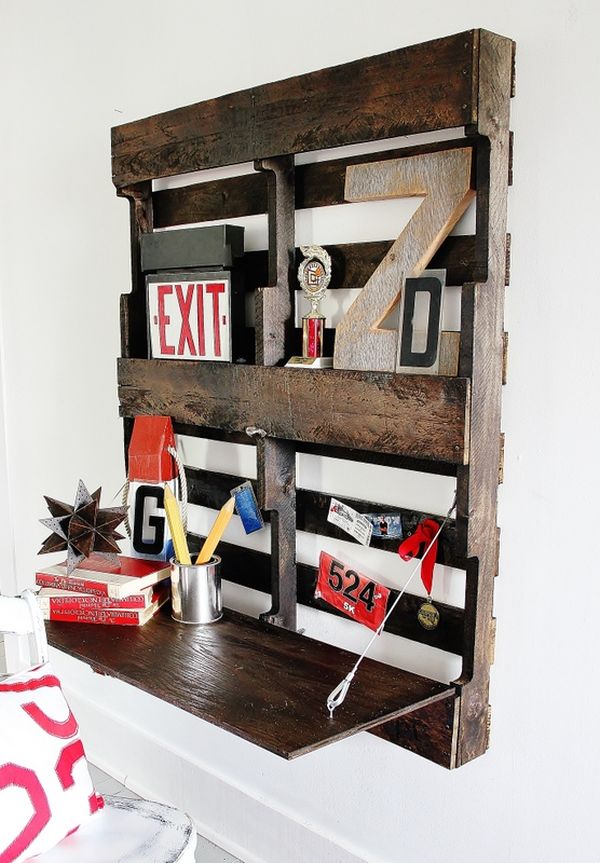
If you’re interested in building your own wall mounted corner desk like the one above, check out these plans from Ana White: http://ana-white.com/2010/05/diy-pallet-desk
A wall-mounted desk is a great way to save space in your home or office. You can mount it on the wall, and then fold it down when you need to use it. In this article, we’ll show you how to build a wall mounted desk with our easy step-by-step instructions.
The first thing you need to do is measure your wall and determine where you want your desk to be located. You’ll also need to decide how large you want your desk to be, since that will affect how much lumber you’ll need.
Once you have all your measurements, go ahead and cut some 2x4s into lengths that are 24″ long (or whatever length works best for your project). Then cut two pieces at 18″ long; these will be used as legs for the desk. Cut one piece at 12″ long; this will be used for the lower crossbar of the desk. Cut four more pieces at 2′ long; these will be used as braces between each leg of the desk.
Next, build a frame out of these boards by attaching them together with nails or screws in an X shape (see photo above). Don’t worry about nailing or screwing through any boards that aren’t directly touching each other; just
Wall Mounted desks are the perfect solution for small spaces where you have a lot of stuff to organize. The best way to make a wall mounted desk is using the “Ikea Lack” shelf.
Hang this shelf on your wall and use it as a desk or as a shelf for your books.

Materials Needed:
-Lack Shelf (or any other IKEA shelf)
-Drill bit set
-Measuring tape or ruler
-Clamps
-4×4 lumber (1×4 lumber)
If you’re looking for a desk that can fit in a corner, then this is the one for you. The design is very simple and easy to follow.
This DIY wall-mounted desk is only about 24 inches deep and 36 inches wide, so it doesn’t take up much space, but it still has everything you need to get your work done.
It features two drawers, two shelves and a pull-out keyboard tray, as well as plenty of room underneath for storage. It’s also portable so you can easily move it around the house or office if needed.
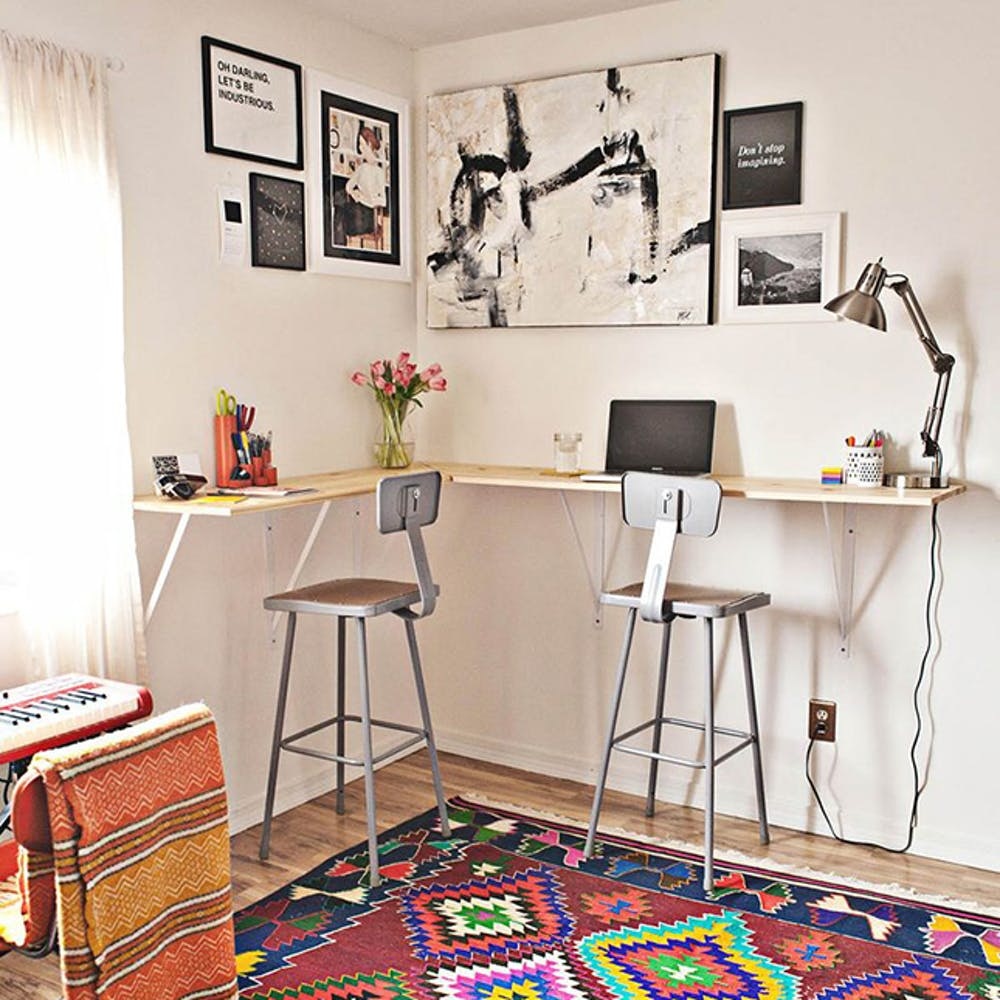
How to build a wall mounted corner desk
A wall-mounted desk is a great way to save space and make your home office more efficient. Here’s how to build one.
If you’re looking for an affordable and efficient way to get some extra work done at home, consider building a wall-mounted desk. A wall-mounted desk is especially useful if you have limited space in your home or office. You can build a simple wall-mounted desk with the right tools and materials.
This DIY project guide will walk you through how to build a wall-mounted corner desk that folds down when not in use. It’s perfect for small spaces like apartments or offices. The project requires basic carpentry skills and tools, as well as basic knowledge of electricity and plumbing.
Materials Needed:
Three pieces of 2×4 lumber for the legs (cut these down to size)
One piece of plywood for the top (cut into two pieces)
Two pieces of plywood for the sides (cut into two pieces)
Two shelves from 3/4″ plywood cut out to fit under each shelf
How to Build a Wall Mounted Corner Desk
Learn how to build your own wall mounted corner desk with this step by step guide. This is a great way to save space and create extra storage in your home office. Here’s what you need:
Materials:
-16 foot long 2×4 boards (cut into 4 equal lengths)
-2x2x8 (cut into 4 equal lengths)
-2x4x8 (cut into 4 equal length)
-1 1/2 inch screws (1 box)
-wood glue (optional)
Tools:
-power drill
Step 1: Build the wall-mounted desk
This step by step tutorial will show you how to build a wall mounted corner desk. This design is ideal for small spaces in your home or office. The wall mounted desk can be folded down when not in use, but it’s easy to pull out when you need it.
You’ll need some basic tools and supplies:
Tools
Drill/driver with 3/8 inch masonry bit (or 1/2 inch bit if you’re using 2x4s)
Cordless drill/driver with Phillips head screwdriver bit (optional)
Tape measure, pencil and level
Supplies
Two 4×8 sheets of 3/4 inch plywood (or two 2x4s)
Twelve 3 inch deck screws or pocket screws depending on your preference* *I used pocket screws because they make assembly easier and faster. You’ll also need a drill to drive them into the plywood if you don’t have a power driver. If you don’t have either, skip this step and just use regular screws instead.
If you’re looking for a way to make your space more functional, consider building a wall-mounted desk. This will give you extra work space without taking up valuable floor space.
To build a wall-mounted corner desk, you’ll need:
Materials: 2x4s, plywood board, screws and nails (1/4″ and 3/4″)
What You’ll Do: Build two support frames for the sides of the desk using 2x4s. Attach them to each other with plywood boards on top and bottom. Secure everything together with screws or nails. Attach the top frame to the wall with hinges so that it can fold up when not in use. Add casters to the bottom of each leg so that it moves easily around your office space.
When building a wall mounted desk, it’s important to consider the materials used. The best options are steel and hardwood, with steel being more durable and hardwood offering more flexibility in terms of style.
The first step is to measure the area where you want to place your desk. This will ensure you buy enough material when purchasing supplies. The next step is to create a plan for how you want your desk to look and function. You should also make sure that this plan meets all safety regulations set forth by local building codes and ordinances. Once you’ve decided on the design, you can begin building.
First, cut two pieces of wood that are slightly longer than the width of your desk top. Next, cut these pieces down so that they are exactly as long as the depth of your desk top plus one inch beyond it on either side (this will allow for hinges). Then attach these pieces together using screws or nails so that they form a box frame around your top piece of plywood (the top piece should be flush with the edges of this frame). Finally, add hinges to both sides of this frame so that when it’s open it will lie flat against one wall (this will be used later when installing).