How to build a shelf in a wall
Tired of buying stuff and never using it? Disappointed with how little space you have in your home’s shed? I know the feeling. Chances are if you’re reading this article you know the solution to your problems too because you’re shopping on our website! Here are a few tips on what to do:
Building a cupboard in your shed is much simper than constructing a bookshelf inside the home. Plus, you will get more storage space for lawn care items and gardening tools. Here’s a short and sweet intro paragraph to your blog post. If a picture speaks a thousand words, a video would be worth so much more. This is also great for building your mailing list, which is what I’m here to talk about today. [Insert Video]
How to build a shelf in a wall
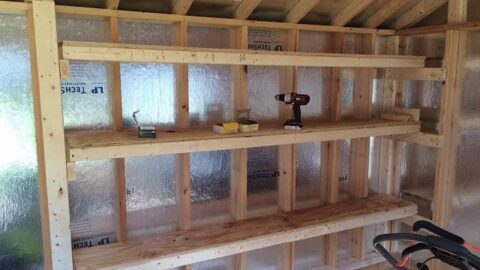
In this video, you’ll learn how to build a simple shelf in your shed. This is one of the easiest woodworking projects you can do, and it will give you plenty of storage space for small items. If you want more room, just add another board on top of the first one for double the storage area.
This video shows you how to build a shelf in your shed. You can use it as extra storage or to hold tools that don’t fit on hooks on the wall. It’s not difficult at all; just attach two pieces of plywood with nails or screws, then fill any gaps with caulk before adding paint or stain if desired.
How long should it take to build a shed?
This video shows you how long it should take to build your own shed from scratch. The average time is 2 days, but if you’re doing it alone and have no experience, then 4 days is more realistic (since there are many steps involved).
Build a shelf in your shed. A shelf will help you maximize the storage space in your shed. It’s also a great way to display items that are meaningful to you or that you want to show off.
Use these steps to build a shelf in your shed:
Measure the inside width and depth of the door opening on your shed. Measure from both sides to ensure accuracy. Cut two pieces of lumber to the correct length for each side of the opening and one piece for the top edge of each side (the height will depend on how deep you want your shelf). Sand each piece and then apply a coat of primer paint. Paint all sides, including top and bottom edges, with exterior paint. Let dry completely before installing them into place.
Attach one side piece to each side of the opening with screws or nails through predrilled holes; use at least two screws per end piece. Slide one end piece into place underneath its corresponding counterpart so that they line up perfectly, then attach with nails or screws through predrilled holes; use at least two screws per end piece. Repeat this step until both sides are installed along with their corresponding topsides; do not tighten any screws until
Building a shelf in your shed is a great way to add extra storage space to your shed. Shelves are easy to build and can be customized to fit any size of shed.
Shelves can be used for many different things including: storing tools, displaying collectables, or even as an entertainment center.

The best way to build shelves in your shed is by using 2x4s or 2x6s, depending on the size of your shed. Plywood is also a popular choice because it’s strong and inexpensive.
Before we get started with instructions on how to build a shelf in a shed, let’s take a look at some tips that will help you make sure your shelf fits perfectly:
Measure the inside dimensions of your shed and calculate how much space you need between each shelf post
Make sure that each post is spaced evenly throughout the entire length of the shelf so that it looks symmetrical from all angles
There are two methods for building shelves in a shed. The first is to use framing lumber and the second is to use tongue and groove boards.
The frame method is much quicker and easier than using tongue and groove boards, but it doesn’t look as nice. If you want a simple shelf that will hold up for years of use, then this is what you should do.
The frame method involves cutting 4×4 posts to the length of your shelf and attaching them together with 2×4s. You can get away with using just two posts if you only have one shelf, or four posts if you have multiple shelves or if they are very long in length. Attach these together with some 2×4s and make sure they are square by measuring diagonally from corner to corner at several points along each side of the frame. Use clamps to hold everything together while you drill holes through each post into the 2×4s using lag bolts (make sure these are long enough so that they protrude from both sides). If there are multiple shelves in your shed then make sure that each one is centered over an existing post so that it will be supported correctly by these posts.
How to Build a Shed
Building a shed is a great way to add storage space and create extra living space. Learn how to build a shed with these step-by-step instructions.
Step 1: Choose the Right Location
The location of your shed can have a huge impact on how well it works for you. For example, if you want to store tools or lawn equipment, you should put it near the back or side of your property so that it’s not in the way of people walking by. Also, take into consideration whether or not you want people to see your shed from the street or not (for privacy reasons).
Step 2: Mark Out the Foundation
Before you start building your shed, mark out where it will go on the ground and dig out enough dirt so that you have something solid underneath it. Then, use stakes and string to make sure that everything is level and straight before going any further.